SwiftUI List: Deep Dive
DevTechie Inc

SwiftUI’s List view is a container that presents vertically scrollable data arranged in a single column. List view is a performant alternative to ScrollView in terms of memory and performance. It is is UIKit’s UITableView equivalent in SwiftUI. Lists can be used to layout static as well as dynamic content.
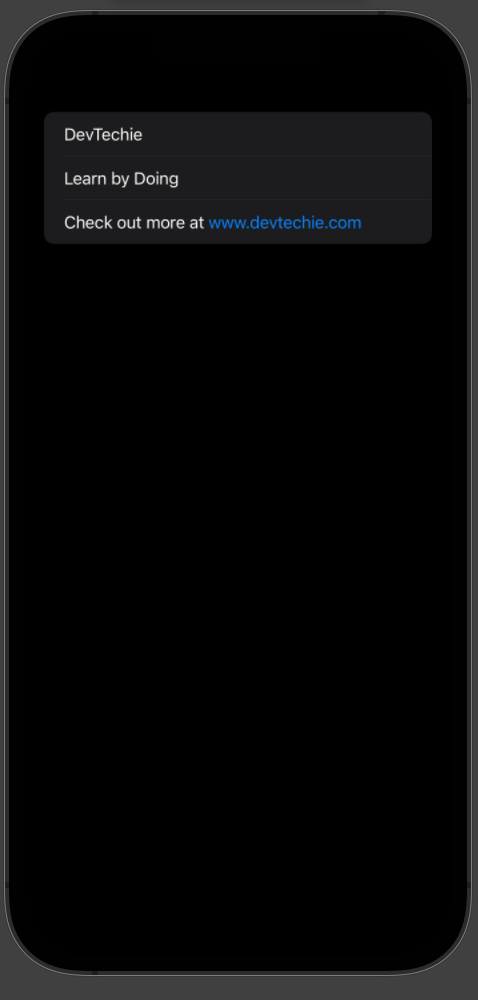
Let’s start with simplest example for List
struct BasicListExample: View {
    var body: some View {
        List {
            Text("DevTechie")
            Text("Learn by Doing")
            Text("Check out more at www.devtechie.com")
        }
    }
}
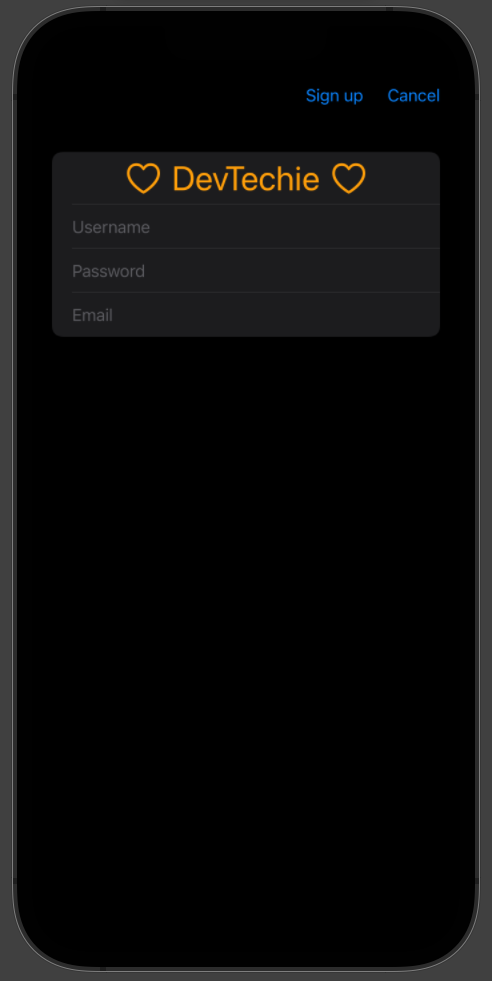
Static List with Mixed Views
List can host all kind of views. Use them wherever you need to display scrollable content. For our use case, we will create simple signup view for DevTechie Courses app.
struct SignupView: View {
    @State private var username = ""
    @State private var password = ""
    @State private var email = ""

    var body: some View {
        NavigationView {
            List {
                HStack {
                    Spacer()
                    Image(systemName: "heart")
                    Text("DevTechie")
                    Image(systemName: "heart")
                    Spacer()
                }
                .font(.largeTitle)
                .foregroundColor(.orange)

                TextField("Username", text: $username)
                SecureField("Password", text: $password)
                TextField("Email", text: $email)
            }
            .toolbar {
                ToolbarItem(placement: .primaryAction) {
                    Button("Sign up") {}
                }
                ToolbarItem(placement: .destructiveAction) {
                    Button("Cancel") {}
                }
            }
            .navigationBarTitleDisplayMode(.inline)
        }
    }
}
Dynamic List
More common use case for list is to create a list dynamically from an underlying collection of data. For our dynamic list example, we will build out data model with the name DevTechieCourse, this model will conforms to Identifiableprotocol.
Note: Conformance to Identifiable protocol ensures that the type can be identified uniquely. The protocol itself has only one requirement, which is that the conforming type must contain a property called id to contain a unique identifier. id parameter tells List how to identify each row uniquely so the list can perform delete or reorder operations on list rows.
struct DevTechieCourse: Identifiable {
    let id = UUID()
    var name: String
    var type: String
}
Here, we are creating three properties.
id represents the unique identifier for the course and it is initialized with UUID
name represents the name of the course
type represents the type of the course
Once we have our model ready, we will add some sample data using and extension to DevTechieCourse model. Listknows how to iterate over collection of data so we will return an array of sample courses in a static variable called sampleas shown below.
extension DevTechieCourse {
static var sample: [DevTechieCourse] {
[
DevTechieCourse(name: "Mastring SwiftUI 3", type: "Video Course"),
DevTechieCourse(name: "Build Goals app in SwiftUI 3 & Firebase", type: "Video Course"),
DevTechieCourse(name: "Disney Plus Clone in SwiftUI", type: "Video Course"),
]
}
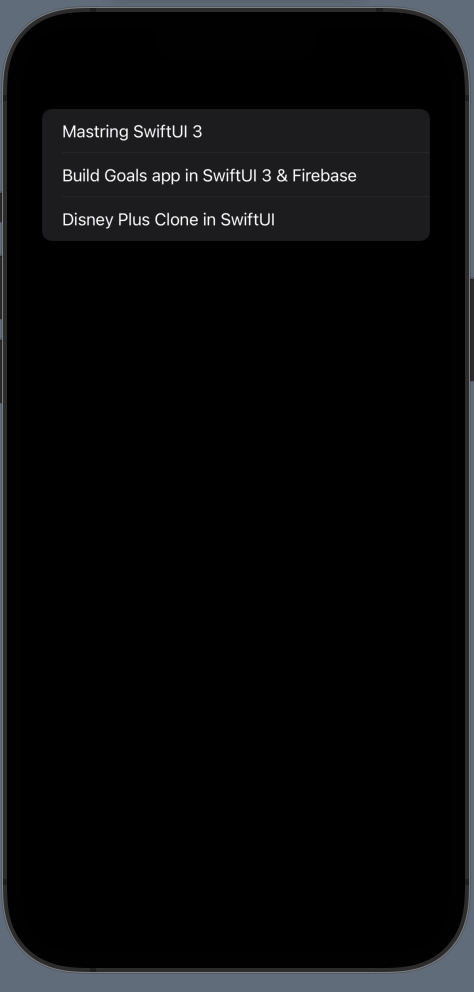
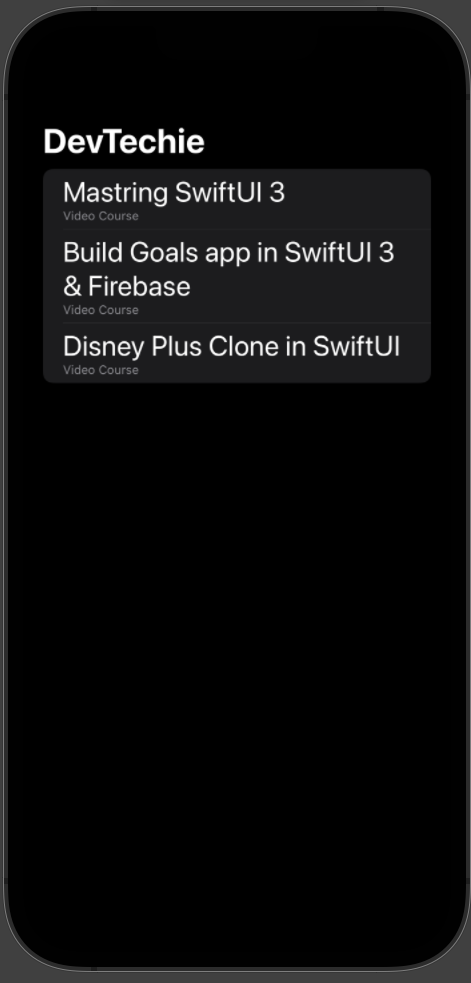
}With our model and sample data in place, next we will create a dynamic list. We will pass DevTechieCourse.sample into List’s first parameter and render course row inside the content closure as shown below.
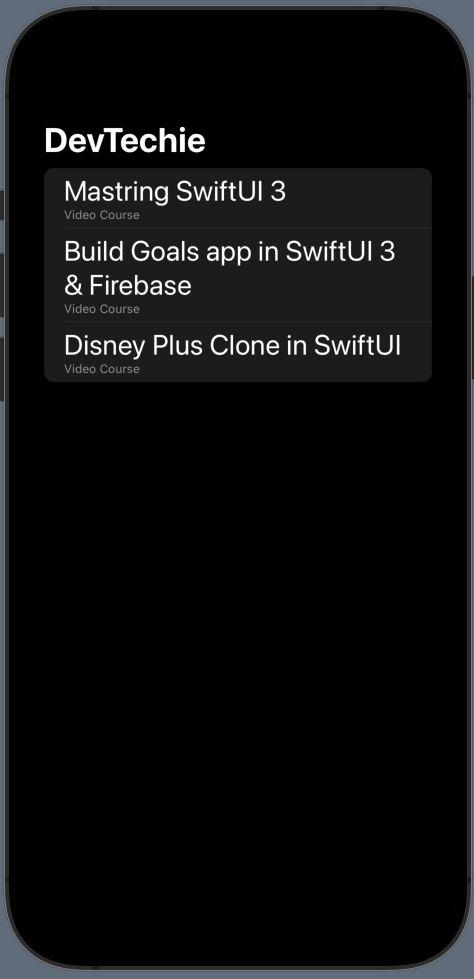
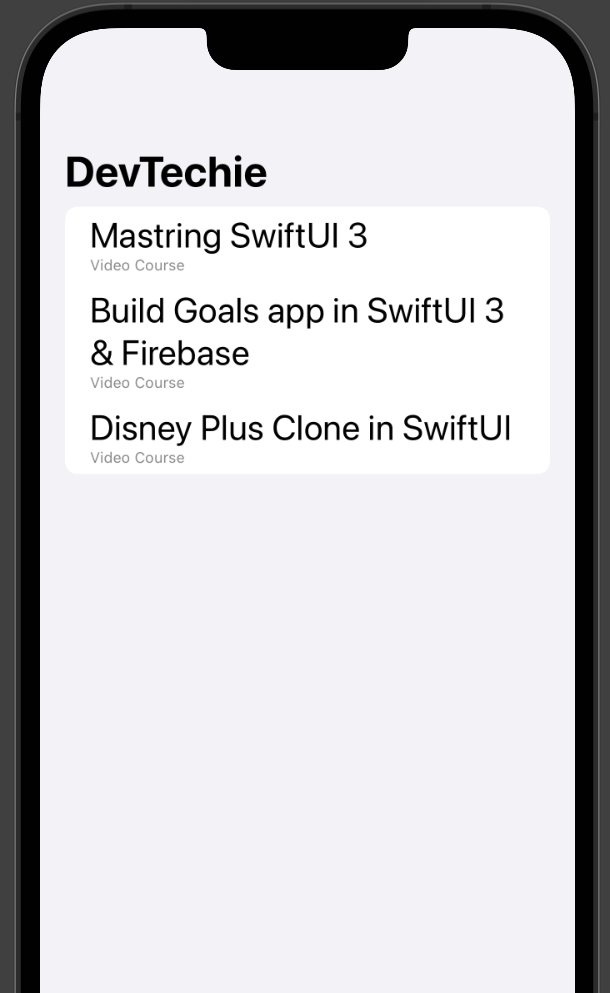
struct DevTechieCoursesHome: View {
var body: some View {
List(DevTechieCourse.sample) { course in
Text(course.name)
}
}
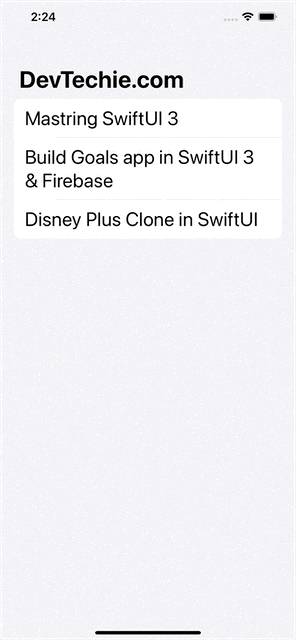
}Our view will look like this:
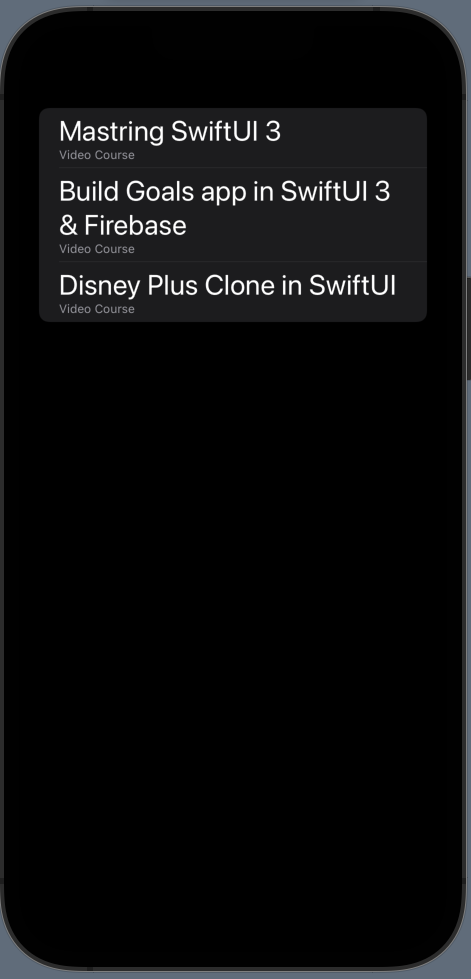
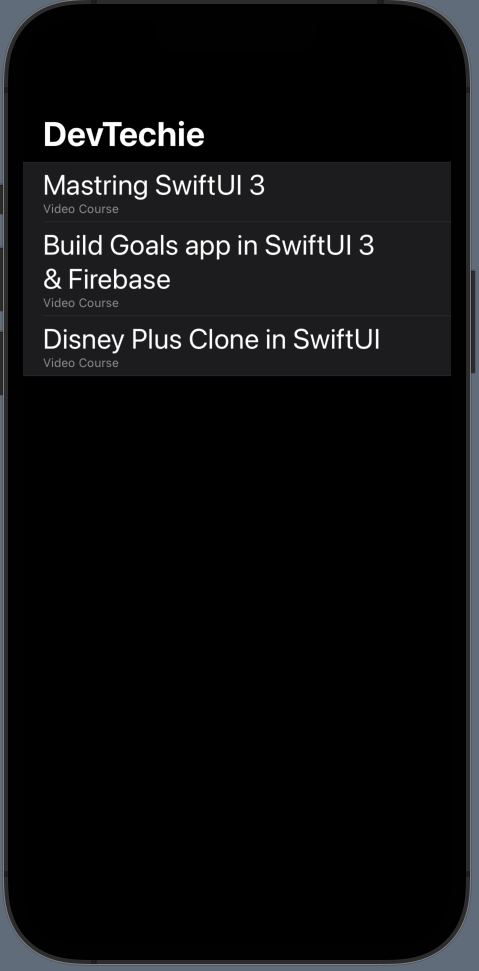
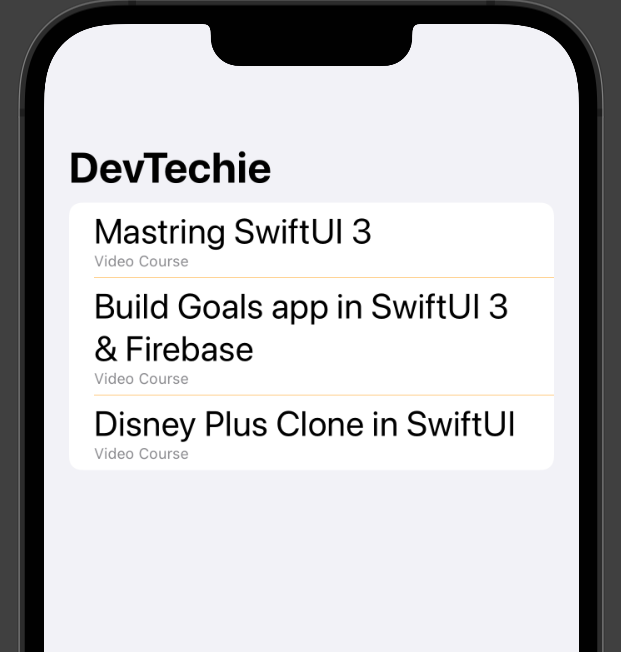
Let’s add course type information as well to our list row as shown below:
struct DevTechieCoursesHome: View {
    var body: some View {
        List(DevTechieCourse.sample) { course in
            VStack(alignment: .leading) {
                Text(course.name)
                    .font(.title)
                Text(course.type)
                    .font(.caption)
                    .foregroundColor(.secondary)
            }
        }
    }
}
List with an Array
Dynamic List can also be created using a simple array. Array type can be any type as long as it conforms to Hashableprotocol.
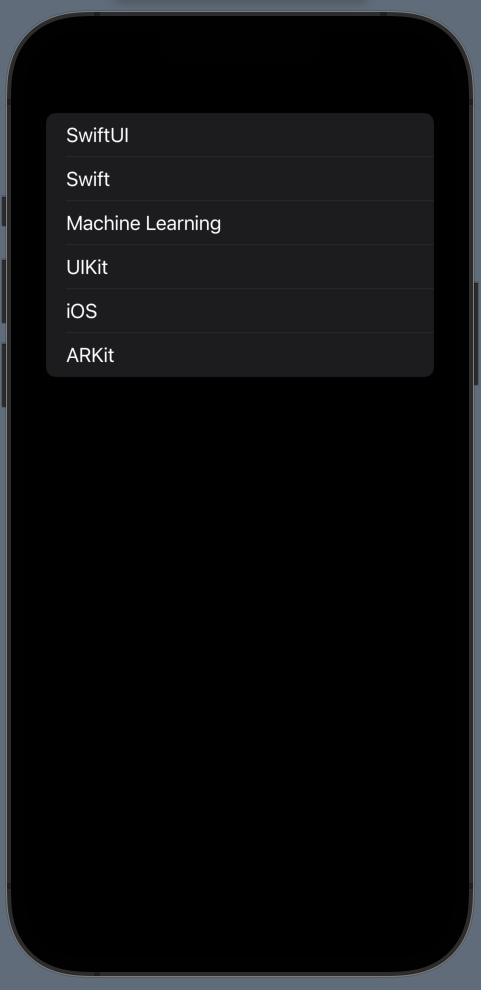
For our example, we will use an array of string which will list out course categories for DevTechie courses app.
struct ListWithArray: View {
    let courseCategoryList = ["SwiftUI", "Swift", "Machine Learning", "UIKit", "iOS", "ARKit"]    var body: some View {
        List(courseCategoryList, id: \.self) { category in
            Text(category)
                .font(.title3)
        }
    }
}
Note: take a look at the use of id: \.self . Here we are telling list to use value of string itself to be the unique identifier.
Selection in List
List supports item selection for single or multiple rows. In order to make rows of a list selectable, you simply need to provide a binding to the selection variable.
Let’s see an example for single selection, we will create an array of course category for users to choose from. We will also need a State variable to keep user’s selection. Select option is supported by default in List but only when the List is in edit mode so we will wrap our list into a NavigationView and add a toolbar to display EditButton. From here, SwiftUI will handle Edit/Done state and will put List in correct editing mode, depending upon editing state, as shown below.
struct ListWithSelection: View {
    let courseCategoryList = ["SwiftUI", "Swift", "Machine Learning", "UIKit", "iOS", "ARKit"]    @State private var selectedItem: String?

    var body: some View {
        NavigationView {
            List(courseCategoryList, id: \.self, selection: $selectedItem) { category in
                Text(category)
                    .font(.title3)
            }
            .navigationTitle("DevTechie")
            .toolbar {
                EditButton()
            }
        }
    }
}
Selection in list with custom object is as easy as it is with the string array. Let’s create an example where we will display DevTechie courses in a selection ready list.
struct ListWithSelection2: View {
    let courses = DevTechieCourse.sample

    @State private var selectedItem: UUID?

    var body: some View {
        NavigationView {
            List(courses, selection: $selectedItem) { course in
                VStack(alignment: .leading) {
                    Text(course.name)
                        .font(.title)
                    Text(course.type)
                        .font(.caption)
                        .foregroundColor(.gray)
                }
            }
            .navigationTitle("DevTechie")
            .toolbar {
                EditButton()
            }
        }
    }
}
Binding to a single instance of the list data’s Identifiable.ID type creates a single-selection list. Binding to a Setcreates a list that supports multiple selections.
Following example shows how to add multi-select to the previous example.
struct ListWithSelection2: View {
    let courses = DevTechieCourse.sample

    @State private var selectedItem = Set<UUID>()

    var body: some View {
        NavigationView {
            List(courses, selection: $selectedItem) { course in
                VStack(alignment: .leading) {
                    Text(course.name)
                        .font(.title)
                    Text(course.type)
                        .font(.caption)
                        .foregroundColor(.gray)
                }
            }
            .navigationTitle("DevTechie")
            .toolbar {
                EditButton()
            }
        }
    }
}
ForEach in List
ForEach in List gives more power to the List View. There are three main operations that can only be done with ForEachinside a List.
onMove and onDelete are only supported with ForEach in List because these functions only work with views that implement DynamicViewContent protocol and ForEach view is the only view that conforms to this protocol.
Let’s work on an example to support these functionalities.
Start with adding ForEach into the List. Notice that not much changes in the output.
struct ListWithForEach: View {
    let courses = DevTechieCourse.sample

    var body: some View {
        NavigationView {
            List {
                ForEach(courses) { course in
                    VStack(alignment: .leading) {
                        Text(course.name)
                            .font(.title)
                        Text(course.type)
                            .font(.caption)
                            .foregroundColor(.gray)
                    }
                }
            }
            .navigationTitle("DevTechie")
        }
    }
}
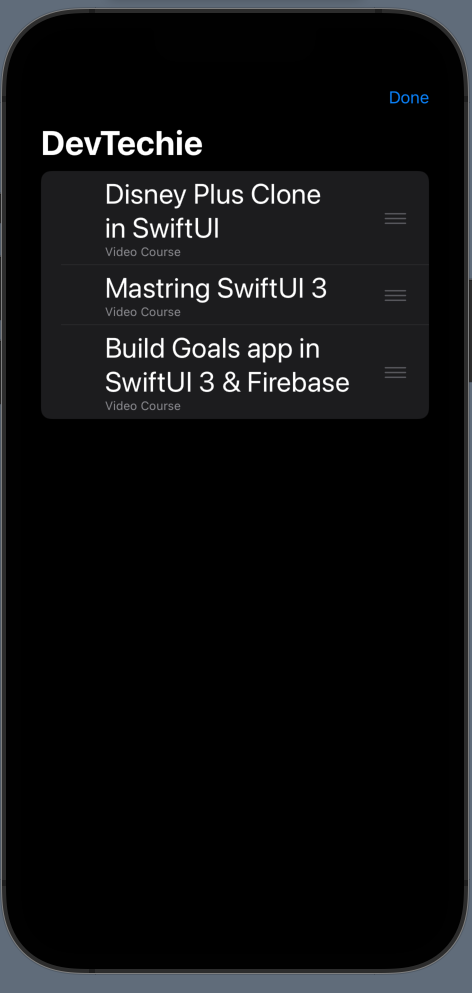
Move Items in List
List items support reordering, ForEach inside List has capability to move item from one index to another with the help of onMove function. Let’s build an example to move items around.
struct ListWithForEach: View {
    @State private var courses = DevTechieCourse.sample

    var body: some View {
        NavigationView {
            List {
                ForEach(courses) { course in
                    VStack(alignment: .leading) {
                        Text(course.name)
                            .font(.title)
                        Text(course.type)
                            .font(.caption)
                            .foregroundColor(.gray)
                    }
                }
                .onMove(perform: moveItems)
            }
            .navigationTitle("DevTechie")
            .toolbar {
                EditButton()
            }
        }
    }

    func moveItems(from indexSet: IndexSet, to destination: Int) {
        guard let idx = indexSet.first else { return }

        let removedCourse = courses.remove(at: idx)
        courses.insert(removedCourse, at: destination)

    }
}
Delete Items in List
Once we have ForEach inside the List, we will be able to add delete functionality to the List. We will change our courses variable from constant to State variable because we will be making changes to the collection by removing elements from the courses array.
struct ListWithForEach: View {
    @State private var courses = DevTechieCourse.sample

    var body: some View {
        NavigationView {
            List {
                ForEach(courses) { course in
                    VStack(alignment: .leading) {
                        Text(course.name)
                            .font(.title)
                        Text(course.type)
                            .font(.caption)
                            .foregroundColor(.gray)
                    }
                }
                .onDelete(perform: deleteItem)
            }
            .navigationTitle("DevTechie")
        }
    }

    func deleteItem(at indexSet: IndexSet) {
        courses.remove(atOffsets: indexSet)
    }
}
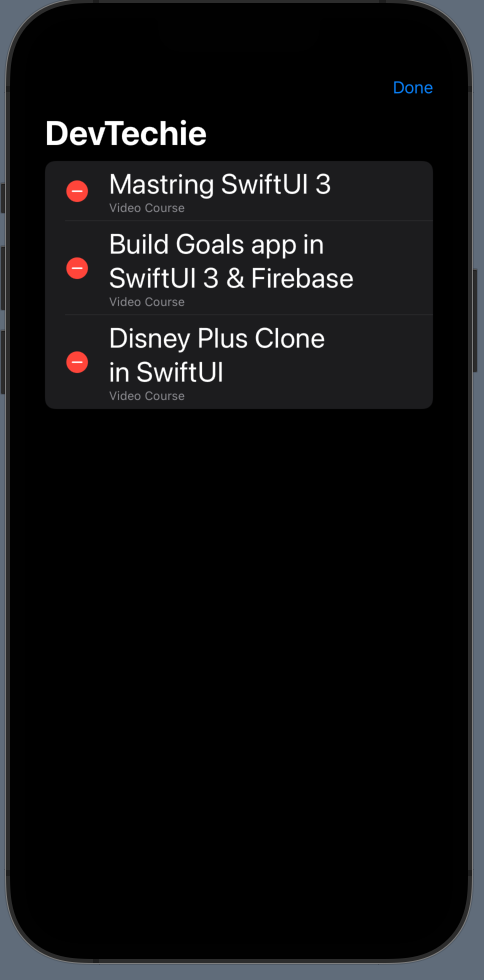
Adding onDelete adds swipeToDelete functionality to the List but if we add EditButton to the toolbar, we can get delete functionality in edit mode as shown below:
struct ListWithForEach: View {
    @State private var courses = DevTechieCourse.sample

    var body: some View {
        NavigationView {
            List {
                ForEach(courses) { course in
                    VStack(alignment: .leading) {
                        Text(course.name)
                            .font(.title)
                        Text(course.type)
                            .font(.caption)
                            .foregroundColor(.gray)
                    }
                }
                .onDelete(perform: deleteItem)
            }
            .navigationTitle("DevTechie")
            .toolbar {
                EditButton()
            }
        }
    }

    func deleteItem(at indexSet: IndexSet) {
        courses.remove(atOffsets: indexSet)
    }
}
List Styles
List can be styled with ListStyle modifier. There are a few styles you can choose from.
We will continue to use DevTechie courses list for our example.
.automatic listStyle: This is style is applied to the list automatically and this styles list based on system’s context.
struct ListStyleExample: View {
    let courses = DevTechieCourse.sample

    var body: some View {
        NavigationView {
            List(courses) { course in
                VStack(alignment: .leading) {
                    Text(course.name)
                        .font(.title)
                    Text(course.type)
                        .font(.caption)
                        .foregroundColor(.gray)
                }
            }
            .listStyle(.automatic)
            .navigationTitle("DevTechie")
        }
    }
}
.grouped listStyle
struct ListStyleExample: View {
    let courses = DevTechieCourse.sample

    var body: some View {
        NavigationView {
            List(courses) { course in
                VStack(alignment: .leading) {
                    Text(course.name)
                        .font(.title)
                    Text(course.type)
                        .font(.caption)
                        .foregroundColor(.gray)
                }
            }
            .listStyle(.grouped)
            .navigationTitle("DevTechie")
        }
    }
}
.inset listStyle
struct ListStyleExample: View {
    let courses = DevTechieCourse.sample

    var body: some View {
        NavigationView {
            List(courses) { course in
                VStack(alignment: .leading) {
                    Text(course.name)
                        .font(.title)
                    Text(course.type)
                        .font(.caption)
                        .foregroundColor(.gray)
                }
            }
            .listStyle(.inset)
            .navigationTitle("DevTechie")
        }
    }
}
.insetGrouped listStyle
struct ListStyleExample: View {
    let courses = DevTechieCourse.sample

    var body: some View {
        NavigationView {
            List(courses) { course in
                VStack(alignment: .leading) {
                    Text(course.name)
                        .font(.title)
                    Text(course.type)
                        .font(.caption)
                        .foregroundColor(.gray)
                }
            }
            .listStyle(.insetGrouped)
            .navigationTitle("DevTechie")
        }
    }
}
.plain listStyle
struct ListStyleExample: View {
    let courses = DevTechieCourse.sample

    var body: some View {
        NavigationView {
            List(courses) { course in
                VStack(alignment: .leading) {
                    Text(course.name)
                        .font(.title)
                    Text(course.type)
                        .font(.caption)
                        .foregroundColor(.gray)
                }
            }
            .listStyle(.plain)
            .navigationTitle("DevTechie")
        }
    }
}
.sidebar listStyle
struct ListStyleExample: View {
    let courses = DevTechieCourse.sample

    var body: some View {
        NavigationView {
            List(courses) { course in
                VStack(alignment: .leading) {
                    Text(course.name)
                        .font(.title)
                    Text(course.type)
                        .font(.caption)
                        .foregroundColor(.gray)
                }
            }
            .listStyle(.sidebar)
            .navigationTitle("DevTechie")
        }
    }
}
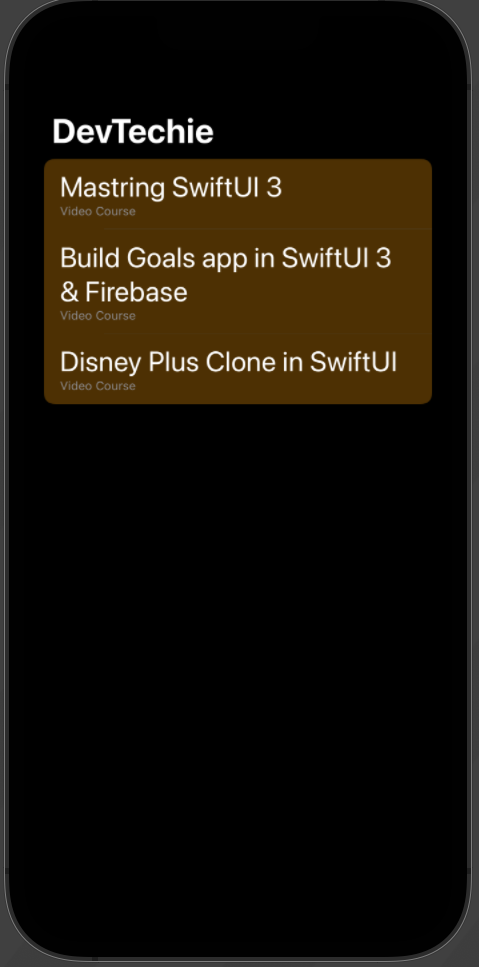
List Item Background Color
List row background color can be changed with the help of listRowBackground modifier. This modifier takes a view type as parameter so possibilities are endless 😃
Let’s set background color for DevTechie course list to orange color.
struct ListStyleExample: View {
    let courses = DevTechieCourse.sample

    var body: some View {
        NavigationView {
            List(courses) { course in
                VStack(alignment: .leading) {
                    Text(course.name)
                        .font(.title)
                    Text(course.type)
                        .font(.caption)
                        .foregroundColor(.gray)
                }
                .listRowBackground(Color.orange.opacity(0.3))
            }
            .listStyle(.sidebar)
            .navigationTitle("DevTechie")
        }
    }
}
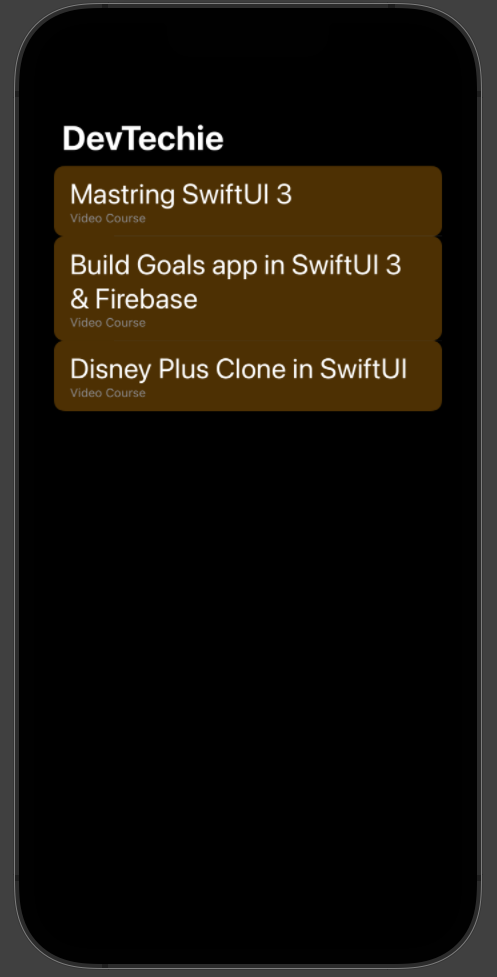
As mentioned earlier, modifier takes view as parameter, we can set background to a shape as well. Let’s apply RoundedRectangle as shape background for the list row.
struct ListStyleExample: View {
    let courses = DevTechieCourse.sample

    var body: some View {
        NavigationView {
            List(courses) { course in
                VStack(alignment: .leading) {
                    Text(course.name)
                        .font(.title)
                    Text(course.type)
                        .font(.caption)
                        .foregroundColor(.gray)
                }
                .listRowBackground(RoundedRectangle(cornerRadius: 10).fill(Color.orange.opacity(0.3)))

            }
            .listStyle(.sidebar)
            .navigationTitle("DevTechie")
        }
    }
}
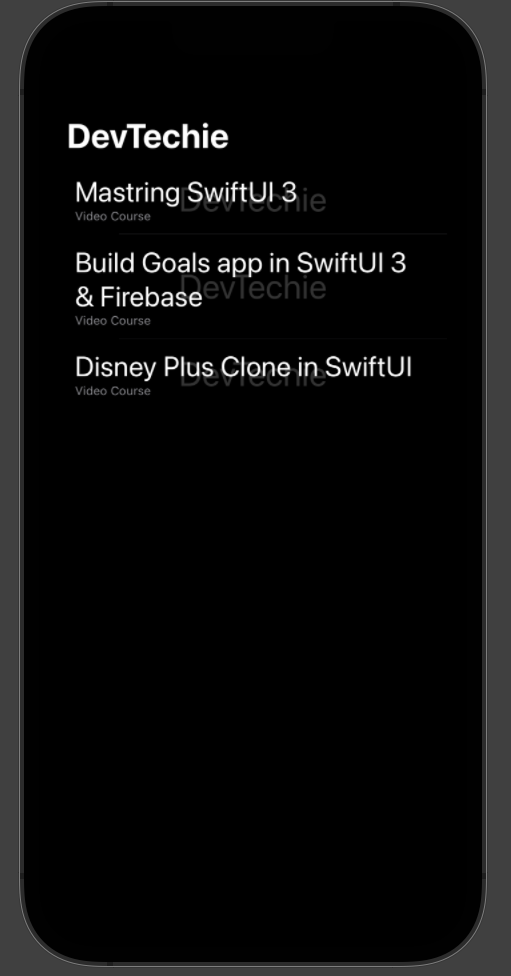
Or you can create a watermark effect with a Text View, as shown below:
struct ListStyleExample: View {
    let courses = DevTechieCourse.sample

    var body: some View {
        NavigationView {
            List(courses) { course in
                VStack(alignment: .leading) {
                    Text(course.name)
                        .font(.title)
                    Text(course.type)
                        .font(.caption)
                        .foregroundColor(.gray)
                }
                .listRowBackground(Text("DevTechie").font(.largeTitle).opacity(0.2))

            }
            .listStyle(.sidebar)
            .navigationTitle("DevTechie")
        }
    }
}
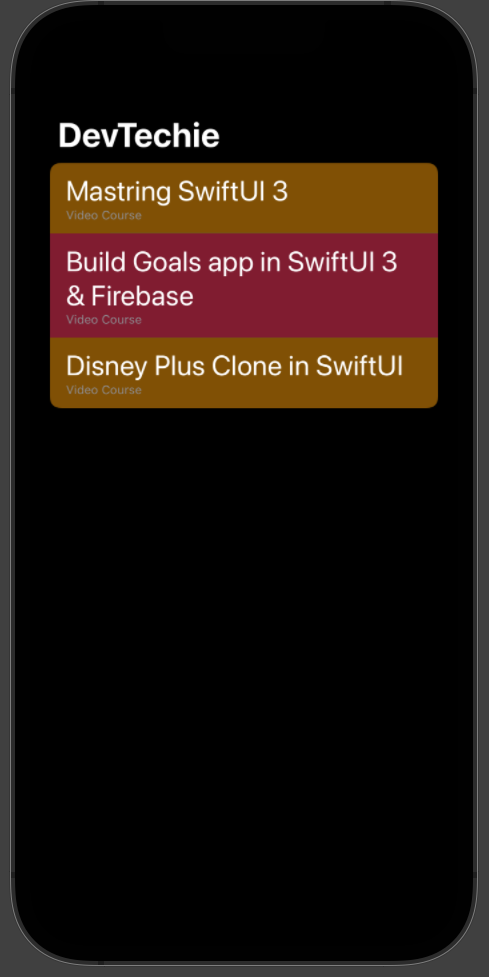
Style Alternate Rows in List
List rows can be set to alternate background style as well but for that we will have to add a bit of logic as its not supported out of the box.
For this we will use collection’s indices property which will give us the index for each item and for every even indexed row, we will use orange color and every odd indexed row will have pink color as shown below:
struct ListStyleExample: View {
    let courses = DevTechieCourse.sample

    var body: some View {
        NavigationView {
            List(courses.indices) { idx in
                VStack(alignment: .leading) {
                    Text(courses[idx].name)
                        .font(.title)
                    Text(courses[idx].type)
                        .font(.caption)
                        .foregroundColor(.gray)
                }
                .listRowBackground(idx % 2 == 0 ? Color.orange.opacity(0.5) : Color.pink.opacity(0.5))

            }
            .listStyle(.sidebar)
            .navigationTitle("DevTechie")
        }
    }
}
List Row Separator
Starting iOS 15, Lists have support to hide/show list row separators. This is done with the help of newly introduced modifier called listRowSeparator
Let’s create an example.
By default, list row separators are visible so let’s hide them for our example:
struct ListStyleExample: View {
    let courses = DevTechieCourse.sample
    var body: some View {
        NavigationView {
            List(courses) { course in
                VStack(alignment: .leading) {
                    Text(course.name)
                        .font(.title)

                    Text(course.type)
                        .font(.caption)
                        .foregroundColor(.secondary)
                }
                .listRowSeparator(.hidden)
            }
            .navigationTitle("DevTechie")
        }
    }
}
If you don’t wanna hide separator but instead give it a different color to match your app’s theme, you can do that with listRowSeparatorTint modifier.
struct ListStyleExample: View {
    let courses = DevTechieCourse.sample
    var body: some View {
        NavigationView {
            List(courses) { course in
                VStack(alignment: .leading) {
                    Text(course.name)
                        .font(.title)

                    Text(course.type)
                        .font(.caption)
                        .foregroundColor(.secondary)
                }
                .listRowSeparatorTint(.orange)
            }
            .navigationTitle("DevTechie")
        }
    }
}
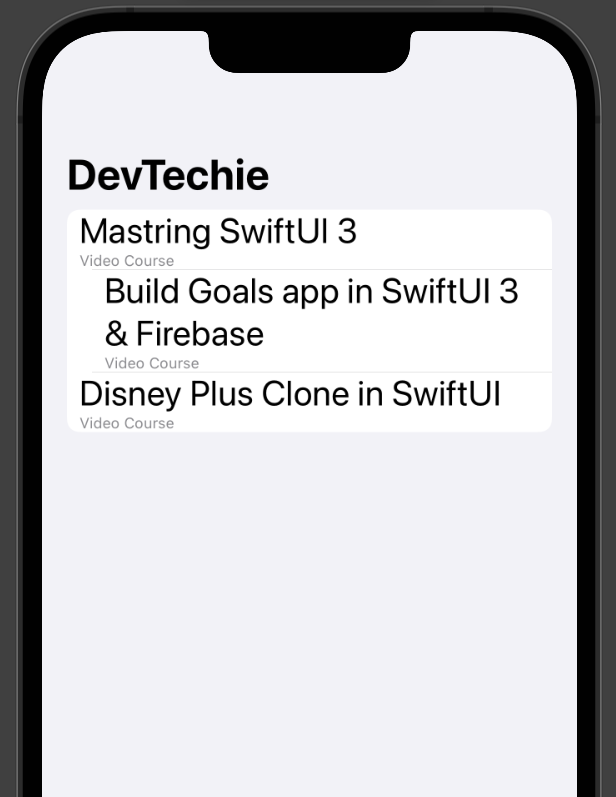
List Row Inset
List’s row inset is set by default but if you are building your layout and need to change that then you can use listRowInsets modifier to change the inset amount around the list content as shown below:
struct ListStyleExample: View {
    let courses = DevTechieCourse.sample
    var body: some View {
        NavigationView {
            List(courses.indices) { idx in
                VStack(alignment: .leading) {
                    Text(courses[idx].name)
                        .font(.title)

                    Text(courses[idx].type)
                        .font(.caption)
                        .foregroundColor(.secondary)
                }
                .listRowInsets(EdgeInsets(top: 0, leading: idx % 2 == 0 ? 10 : 30, bottom: 0, trailing: 10))
                }
            .navigationTitle("DevTechie")
        }
    }
}
Here we are setting inset based on even/odd row check.
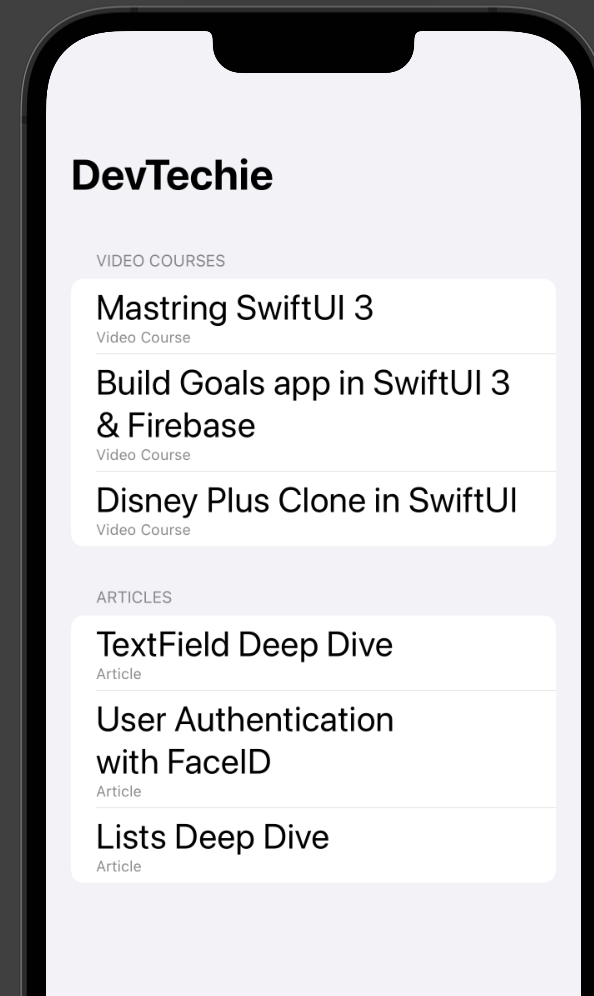
Section Headers and Footers in List
We can add sections to the List as well and with the help of Section we can define header and footer For a List.
For our example, we will create another sample property to our DevTechie course extension so our extension will look like this:
extension DevTechieCourse {
static var sample: [DevTechieCourse] {
[
DevTechieCourse(name: "Mastring SwiftUI 3", type: "Video Course"),
DevTechieCourse(name: "Build Goals app in SwiftUI 3 & Firebase", type: "Video Course"),
DevTechieCourse(name: "Disney Plus Clone in SwiftUI", type: "Video Course"),
]
}
static var sampleArticle: [DevTechieCourse] {
[
DevTechieCourse(name: "TextField Deep Dive", type: "Article"),
DevTechieCourse(name: "User Authentication with FaceID", type: "Article"),
DevTechieCourse(name: "Lists Deep Dive", type: "Article"),
]
}
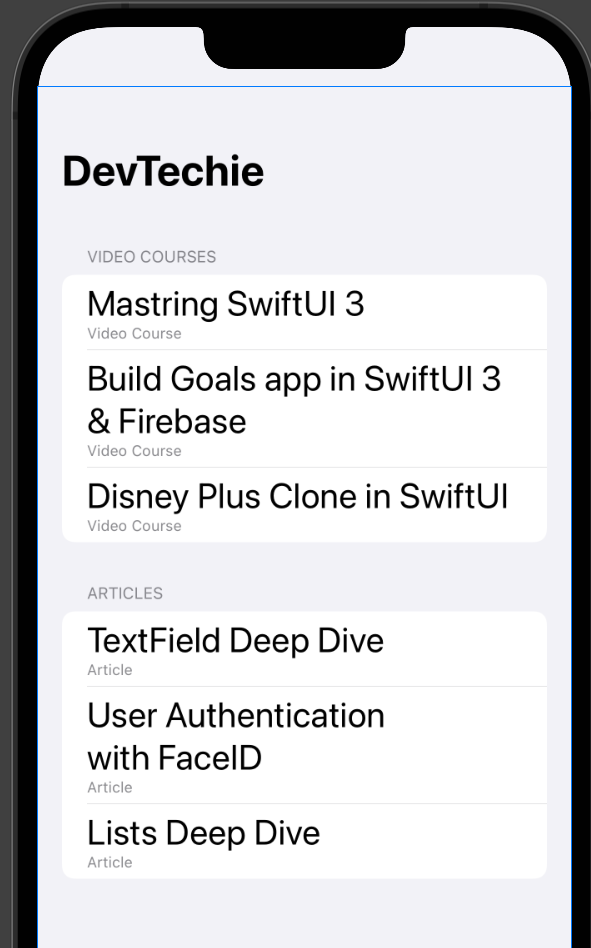
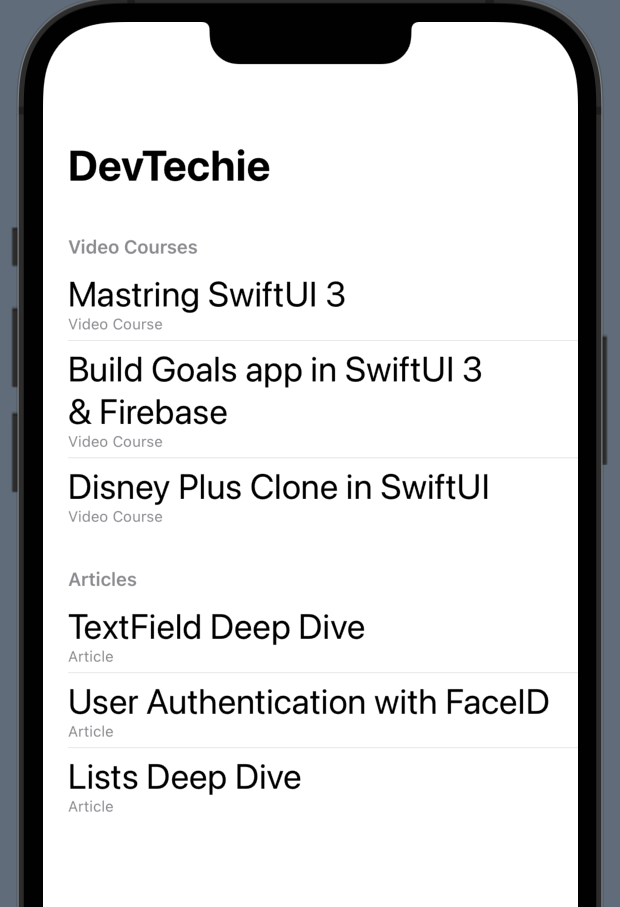
}With sample articles added, we will add two sections in our list. One to show video courses from DevTechie, another to show articles on DevTechie.com
struct ListStyleExample: View {
    let courses = DevTechieCourse.sample
    let articles = DevTechieCourse.sampleArticle

    var body: some View {
        NavigationView {
            List {
                Section(header: Text("Video Courses")) {
                    ForEach(courses) { course in
                        VStack(alignment: .leading) {
                            Text(course.name)
                                .font(.title)

                            Text(course.type)
                                .font(.caption)
                                .foregroundColor(.secondary)
                        }
                    }
                }

                Section(header: Text("Articles")) {
                    ForEach(articles) { course in
                        VStack(alignment: .leading) {
                            Text(course.name)
                                .font(.title)

                            Text(course.type)
                                .font(.caption)
                                .foregroundColor(.secondary)
                        }
                    }
                }
            }
            .navigationTitle("DevTechie")
        }
    }
}
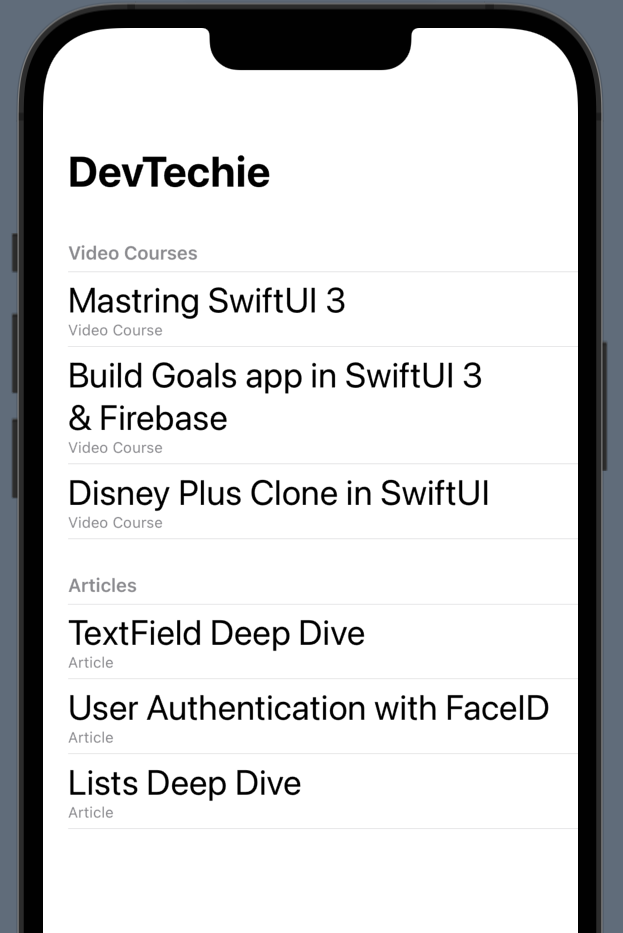
List Styles with Header and Footer
List styles look tad bit different when sections are present in the list so let’s take another look at listStyle modifier.
.automatic
struct ListStyleExample: View {
    let courses = DevTechieCourse.sample
    let articles = DevTechieCourse.sampleArticle

    var body: some View {
        NavigationView {
            List {
                Section(header: Text("Video Courses")) {
                    ForEach(courses) { course in
                        VStack(alignment: .leading) {
                            Text(course.name)
                                .font(.title)

                            Text(course.type)
                                .font(.caption)
                                .foregroundColor(.secondary)
                        }
                    }
                }

                Section(header: Text("Articles")) {
                    ForEach(articles) { course in
                        VStack(alignment: .leading) {
                            Text(course.name)
                                .font(.title)

                            Text(course.type)
                                .font(.caption)
                                .foregroundColor(.secondary)
                        }
                    }
                }

            }
            .listStyle(.automatic)
            .navigationTitle("DevTechie")
        }
    }
}
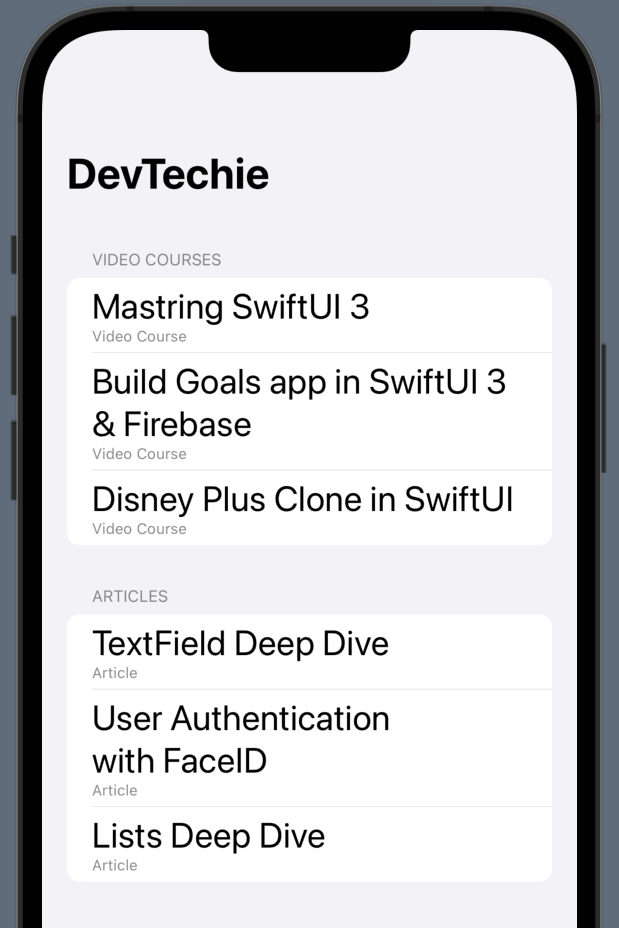
.grouped
struct ListStyleExample: View {
    let courses = DevTechieCourse.sample
    let articles = DevTechieCourse.sampleArticle

    var body: some View {
        NavigationView {
            List {
                Section(header: Text("Video Courses")) {
                    ForEach(courses) { course in
                        VStack(alignment: .leading) {
                            Text(course.name)
                                .font(.title)

                            Text(course.type)
                                .font(.caption)
                                .foregroundColor(.secondary)
                        }
                    }
                }

                Section(header: Text("Articles")) {
                    ForEach(articles) { course in
                        VStack(alignment: .leading) {
                            Text(course.name)
                                .font(.title)

                            Text(course.type)
                                .font(.caption)
                                .foregroundColor(.secondary)
                        }
                    }
                }

            }
            .listStyle(.grouped)
            .navigationTitle("DevTechie")
        }
    }
}
.inset
struct ListStyleExample: View {
    let courses = DevTechieCourse.sample
    let articles = DevTechieCourse.sampleArticle

    var body: some View {
        NavigationView {
            List {
                Section(header: Text("Video Courses")) {
                    ForEach(courses) { course in
                        VStack(alignment: .leading) {
                            Text(course.name)
                                .font(.title)

                            Text(course.type)
                                .font(.caption)
                                .foregroundColor(.secondary)
                        }
                    }
                }

                Section(header: Text("Articles")) {
                    ForEach(articles) { course in
                        VStack(alignment: .leading) {
                            Text(course.name)
                                .font(.title)

                            Text(course.type)
                                .font(.caption)
                                .foregroundColor(.secondary)
                        }
                    }
                }

            }
            .listStyle(.inset)
            .navigationTitle("DevTechie")
        }
    }
}
.insetGrouped
struct ListStyleExample: View {
    let courses = DevTechieCourse.sample
    let articles = DevTechieCourse.sampleArticle

    var body: some View {
        NavigationView {
            List {
                Section(header: Text("Video Courses")) {
                    ForEach(courses) { course in
                        VStack(alignment: .leading) {
                            Text(course.name)
                                .font(.title)

                            Text(course.type)
                                .font(.caption)
                                .foregroundColor(.secondary)
                        }
                    }
                }

                Section(header: Text("Articles")) {
                    ForEach(articles) { course in
                        VStack(alignment: .leading) {
                            Text(course.name)
                                .font(.title)

                            Text(course.type)
                                .font(.caption)
                                .foregroundColor(.secondary)
                        }
                    }
                }

            }
            .listStyle(.insetGrouped)
            .navigationTitle("DevTechie")
        }
    }
}
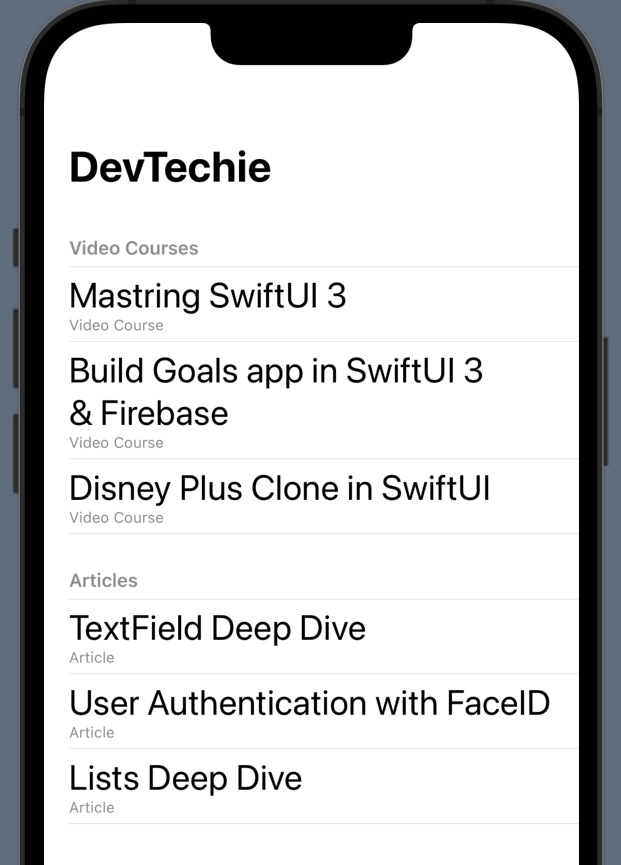
.plain
struct ListStyleExample: View {
    let courses = DevTechieCourse.sample
    let articles = DevTechieCourse.sampleArticle

    var body: some View {
        NavigationView {
            List {
                Section(header: Text("Video Courses")) {
                    ForEach(courses) { course in
                        VStack(alignment: .leading) {
                            Text(course.name)
                                .font(.title)

                            Text(course.type)
                                .font(.caption)
                                .foregroundColor(.secondary)
                        }
                    }
                }

                Section(header: Text("Articles")) {
                    ForEach(articles) { course in
                        VStack(alignment: .leading) {
                            Text(course.name)
                                .font(.title)

                            Text(course.type)
                                .font(.caption)
                                .foregroundColor(.secondary)
                        }
                    }
                }

            }
            .listStyle(.plain)
            .navigationTitle("DevTechie")
        }
    }
}
.sidebar
Most interesting style is .sidebar. If you are looking to create collapsible list then sidebar style is for you.
struct ListStyleExample: View {
    let courses = DevTechieCourse.sample
    let articles = DevTechieCourse.sampleArticle

    var body: some View {
        NavigationView {
            List {
                Section(header: Text("Video Courses")) {
                    ForEach(courses) { course in
                        VStack(alignment: .leading) {
                            Text(course.name)
                                .font(.title)

                            Text(course.type)
                                .font(.caption)
                                .foregroundColor(.secondary)
                        }
                    }
                }

                Section(header: Text("Articles")) {
                    ForEach(articles) { course in
                        VStack(alignment: .leading) {
                            Text(course.name)
                                .font(.title)

                            Text(course.type)
                                .font(.caption)
                                .foregroundColor(.secondary)
                        }
                    }
                }

            }
            .listStyle(.sidebar)
            .navigationTitle("DevTechie")
        }
    }
}
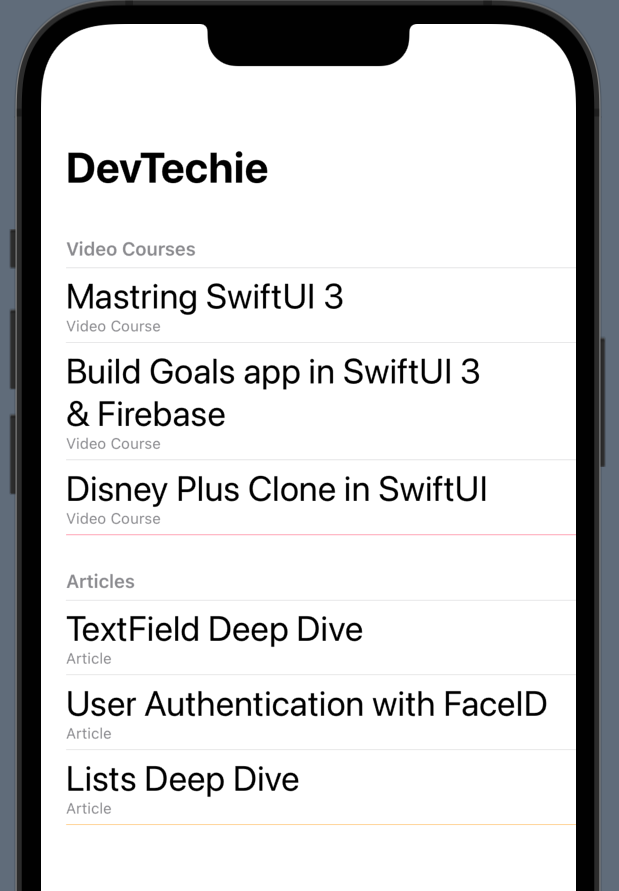
List Section Separator
List sections also have separators, we can hide/show them with the help of listSectionSeparator.
struct ListStyleExample: View {
    let courses = DevTechieCourse.sample
    let articles = DevTechieCourse.sampleArticle

    var body: some View {
        NavigationView {
            List {
                Section(header: Text("Video Courses")) {
                    ForEach(courses) { course in
                        VStack(alignment: .leading) {
                            Text(course.name)
                                .font(.title)

                            Text(course.type)
                                .font(.caption)
                                .foregroundColor(.secondary)
                        }
                    }
                }
                .listSectionSeparator(.hidden)

                Section(header: Text("Articles")) {
                    ForEach(articles) { course in
                        VStack(alignment: .leading) {
                            Text(course.name)
                                .font(.title)

                            Text(course.type)
                                .font(.caption)
                                .foregroundColor(.secondary)
                        }
                    }
                }
                .listSectionSeparator(.hidden)

            }
            .listStyle(.plain)
            .navigationTitle("DevTechie")
        }
    }
}
You can even set tint color for separator with the help of .listSectionSeparatorTint modifier, as shown below:
struct ListStyleExample: View {
    let courses = DevTechieCourse.sample
    let articles = DevTechieCourse.sampleArticle

    var body: some View {
        NavigationView {
            List {
                Section(header: Text("Video Courses")) {
                    ForEach(courses) { course in
                        VStack(alignment: .leading) {
                            Text(course.name)
                                .font(.title)

                            Text(course.type)
                                .font(.caption)
                                .foregroundColor(.secondary)
                        }
                    }
                }
                .listSectionSeparatorTint(.pink)

                Section(header: Text("Articles")) {
                    ForEach(articles) { course in
                        VStack(alignment: .leading) {
                            Text(course.name)
                                .font(.title)

                            Text(course.type)
                                .font(.caption)
                                .foregroundColor(.secondary)
                        }
                    }
                }
                .listSectionSeparatorTint(.orange)

            }
            .listStyle(.plain)
            .navigationTitle("DevTechie")
        }
    }
}
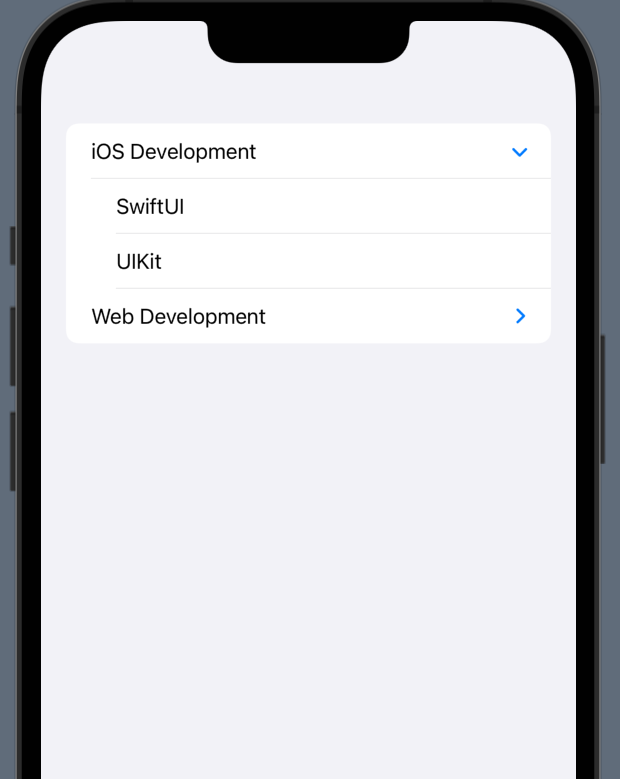
Creating Hierarchical Lists
In SwiftUI List, we can create hierarchical list of arbitrary depth by providing tree-structured data and a childrenparameter that provides a key path to get the child nodes at any level.
Let’s create an example to understand better:
We will start our example with course category model:
struct CourseCategory: Identifiable {
    let id = UUID()
    var title = ""
    var subCategory: [CourseCategory]?
}
using struct extension, we will add sample data to CourseCategory struct
extension CourseCategory {
    static var sample: [CourseCategory] {
        [
            CourseCategory(title: "iOS Development", subCategory: [
                CourseCategory(title: "SwiftUI"),
                CourseCategory(title: "UIKit")
            ]),
            CourseCategory(title: "Web Development", subCategory: [
                CourseCategory(title: "Angular"),
                CourseCategory(title: "Flutter"),
                CourseCategory(title: "React")
            ]),
        ]
    }
}
Now the only thing left to do is to use List with children to render our course categories.
struct ListWithChildren: View {
    var body: some View {
        List(CourseCategory.sample, children: \.subCategory) { category in
            Text(category.title)
        }
    }
}
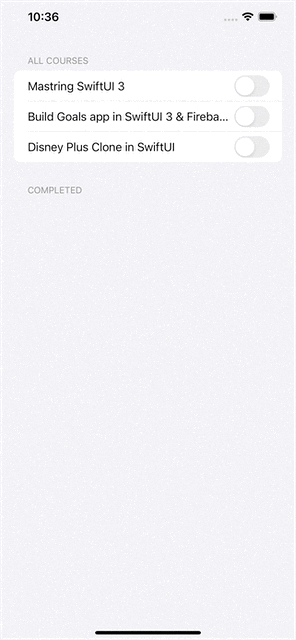
Binding in list
Introduced in iOS 15 and SwiftUI 3, now List allows direct binding to list items. This is helpful as you no longer have to pass closure action to learn about changes to the model.
We will create DevTechie course list where user can Toggle courses that they have completed.
For this we will need a course model with some sample data to work with:
struct DTCourse: Identifiable {
    let id = UUID()
    var title: String
    var completed = false
}extension DTCourse {
    static var sample: [DTCourse] {
        [
            DTCourse(title: "Mastring SwiftUI 3"),
            DTCourse(title: "Build Goals app in SwiftUI 3 & Firebase"),
            DTCourse(title: "Disney Plus Clone in SwiftUI")
        ]
    }
}
Next we will create our list which will have two sections, one for All Courses another for Completed course.
struct ListBindingExample: View {

    @State private var courses = DTCourse.sample
    @State private var completedCourses = [DTCourse]()

    var body: some View {
        List {
            Section(header: Text("All Courses")) {

                ForEach($courses) { $course in
                    HStack {
                    Text(course.title)
                    Spacer()
                    Toggle("", isOn: $course.completed)
                        .onChange(of: course.completed) { newValue in
                            if newValue {
                                completedCourses.append(course)
                            } else {
                                completedCourses.removeAll(where: {$0.id == course.id})
                            }
                        }
                        .labelsHidden()

                    }
                }
            }

            Section(header: Text("Completed")) {
                ForEach(completedCourses) { course in
                    Text(course.title)
                }
            }
        }
    }
}
Safe area inset
Introduced in iOS 15 and SwiftUI 3, SafeAreaInset modifier makes it easy to offset content from SafeArea. Apart from that, it also allows us to add view content to the Safe Area.
For our example, we will add link to DevTechie website()
struct BindingInList: View {
    let courses = DevTechieCourse.sample
    let articles = DevTechieCourse.sampleArticle

    var body: some View {
        NavigationView {
            List {
                Section(header: Text("Video Courses")) {
                    ForEach(courses) { course in
                        VStack(alignment: .leading) {
                            Text(course.name)
                                .font(.title)

                            Text(course.type)
                                .font(.caption)
                                .foregroundColor(.secondary)
                        }
                    }
                }

                Section(header: Text("Articles")) {
                    ForEach(articles) { course in
                        VStack(alignment: .leading) {
                            Text(course.name)
                                .font(.title)

                            Text(course.type)
                                .font(.caption)
                                .foregroundColor(.secondary)
                        }
                    }
                }

            }
            .listStyle(.grouped)
            .safeAreaInset(edge: .bottom) {
                VStack {
                    Text("https://www.devtechie.com")
                        .font(.title)
                }
                .frame(maxWidth: .infinity)
                .background(.ultraThinMaterial)
            }

            .navigationTitle("DevTechie")

        }
    }
}
Pull To Refresh
Another feature introduced with SwiftUI 3 and iOS 15 was Pull to refresh support in List with the help of .refreshablemodifier. Pull to refresh is one of the most used pattern for refresh or request data update on apps.
We will build our example to refresh list of courses from DevTechie.com. We will use another awesome feature from iOS 15 for async calls, called async await.
struct PullToRefreshList: View {

    @State private var courseList = [DTCourse]()

    var body: some View {
        NavigationView {
            List(courseList) { course in
                Text(course.title)
            }
            .refreshable {
                let courses = await refreshCourseList()
                courseList.append(contentsOf: courses)
            }
            .navigationTitle("DevTechie.com")
        }
    }

    func refreshCourseList() async -> [DTCourse] {
        Thread.sleep(until: Date().addingTimeInterval(10))
        return DTCourse.sample
    }
}
Swipe action in List
Custom swipe action is easier then ever with newly introduced .swipeAction modifier. Starting iOS 15+ and SwiftUI 3+, we now have ability to display actions when a row in a list is swiped right or left.
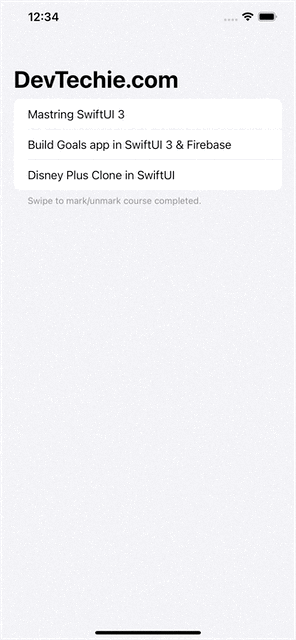
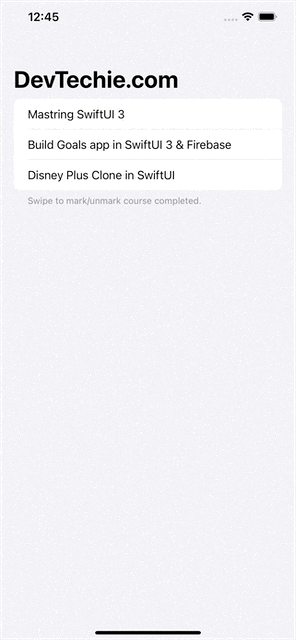
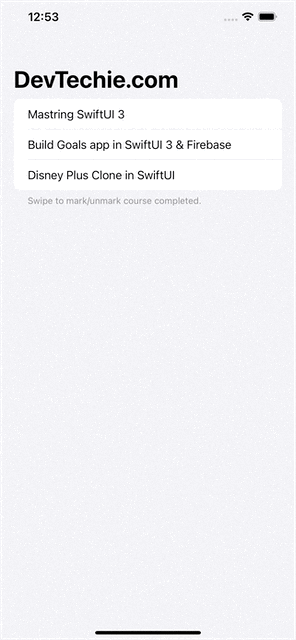
Let’s look at an example, we will create list of DevTechie.com courses and give user ability to swipe to mark/unmark course complete.
We will start with our model and sample data:
struct DTCourse: Identifiable {
    let id = UUID()
    var title: String
    var completed = false
}extension DTCourse {
    static var sample: [DTCourse] {
        [
            DTCourse(title: "Mastring SwiftUI 3"),
            DTCourse(title: "Build Goals app in SwiftUI 3 & Firebase"),
            DTCourse(title: "Disney Plus Clone in SwiftUI")
        ]
    }
}
Next, we will create a List of courses and attach a swipe action to the List item. We will use binding on List item to toggle course complete state directly from the row user performed action on.
struct SwipeActionInList: View {

    @State private var courses = DTCourse.sample

    var body: some View {
        NavigationView {
            List {
                Section(footer: Text("Swipe to mark/unmark course completed.")) {
                    ForEach($courses) { $course in
                        Text(course.title)
                            .strikethrough(course.completed, color: .red)
                            .swipeActions {
                                Button {
                                    course.completed.toggle()
                                } label: {
                                    Label("Done", systemImage: "checkmark.circle.fill")
                                }
                                .tint(Color.pink)
                            }
                    }
                }
            }
            .navigationTitle("DevTechie.com")
        }
    }
}
We can add more swipe actions to List row. We will add two actions to our row. One to mark complete, another to mark in-complete.
struct SwipeActionInList: View {

    @State private var courses = DTCourse.sample

    var body: some View {
        NavigationView {
            List {
                Section(footer: Text("Swipe to mark/unmark course completed.")) {
                    ForEach($courses) { $course in
                        Text(course.title)
                            .strikethrough(course.completed, color: .red)
                            .swipeActions {
                                Button {
                                    course.completed = true
                                } label: {
                                    Label("Done", systemImage: "checkmark.circle.fill")
                                }
                                .tint(Color.pink)

                                Button {
                                    course.completed = false
                                } label: {
                                    Label("Done", systemImage: "minus.circle.fill")
                                }
                                .tint(Color.orange)
                            }
                    }
                }
            }
            .navigationTitle("DevTechie.com")
        }
    }
}
Notice that if user swiped to a certain distance on row, by default trailing-most actions auto-completes but you can control that with a parameter called allowsFullSwipe.
struct SwipeActionInList: View {

    @State private var courses = DTCourse.sample

    var body: some View {
        NavigationView {
            List {
                Section(footer: Text("Swipe to mark/unmark course completed.")) {
                    ForEach($courses) { $course in
                        Text(course.title)
                            .strikethrough(course.completed, color: .red)
                            .swipeActions(allowsFullSwipe: false) {
                                Button {
                                    course.completed = true
                                } label: {
                                    Label("Done", systemImage: "checkmark.circle.fill")
                                }
                                .tint(Color.pink)

                                Button {
                                    course.completed = false
                                } label: {
                                    Label("Done", systemImage: "minus.circle.fill")
                                }
                                .tint(Color.orange)
                            }
                    }
                }
            }
            .navigationTitle("DevTechie.com")
        }
    }
}
We can define direction for swipe as well. In order to accomplish this, we will chain another SwipeAction and add edge parameter to SwipeAction modifier. For our example, we will add actions to leading and tailing swipes in the example, as shown below:
struct SwipeActionInList: View {

    @State private var courses = DTCourse.sample

    var body: some View {
        NavigationView {
            List {
                Section(footer: Text("Swipe to mark/unmark course completed.")) {
                    ForEach($courses) { $course in
                        Text(course.title)
                            .strikethrough(course.completed, color: .red)
                            .swipeActions(edge: .leading, allowsFullSwipe: false) {
                                Button {
                                    course.completed = true
                                } label: {
                                    Label("Complete", systemImage: "checkmark.circle.fill")
                                }
                                .tint(Color.pink)
                            }
                            .swipeActions(edge: .trailing, allowsFullSwipe: false) {
                                Button {
                                    course.completed = false
                                } label: {
                                    Label("InComplete", systemImage: "minus.circle.fill")
                                }
                                .tint(Color.orange)
                            }

                    }
                }
            }
            .navigationTitle("DevTechie.com")
        }
    }
}
Search bar for List
Searching in List is now possible with just few lines of code, thanks to newly introduced modifier called .searchablethis modifier adds a search bar and gives your list search capability just like UISearchController does in UIKit.
Let’s take a look at an example. We will continue to use our DevTechie.com’s course model and build out the list. We will also add a State variable so it can keep search string user is typing. We will also attach an onChange modifier to the State variable and filter out our courses.
struct SearchWithList: View {

    @State private var searchString = ""
    @State private var courses = DTCourse.sample

    var body: some View {
        NavigationView {
            List(courses) { course in
                Text(course.title)
                    .font(.title)
            }
            .searchable(text: $searchString)
            .onChange(of: searchString, perform: { newValue in
                if newValue.isEmpty {
                    courses = DTCourse.sample
                } else {
                    courses = DTCourse.sample.filter { $0.title.lowercased().hasPrefix(searchString.lowercased())}
                }
            })
            .navigationTitle("DevTechie.com")
        }
    }
}
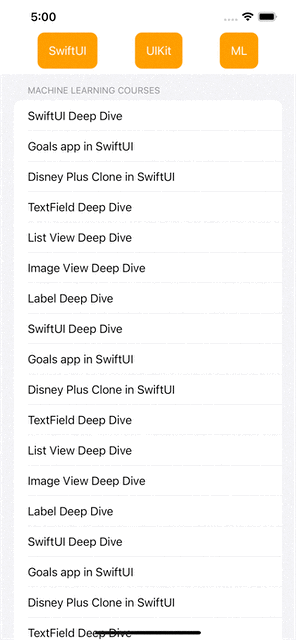
Scroll To Section with ScrollViewReader and List
ScrollViewReader is a view that provides programmatic scrolling, by working with a proxy to scroll to known child views. The scroll view reader’s content view builder receives a ScrollViewProxy instance; you use the proxy’s scrollTo(_:anchor:) to perform scrolling.
We can combine ScrollViewReader with List to perform programmatic scrolling. For this example, we will need lots of data so we will create a new sample variable on DTCourse model and repeat content to create long list of courses.
extension DTCourse {
    static var swiftUISample: [DTCourse] {
        [
            DTCourse(title: "SwiftUI Deep Dive"),
            DTCourse(title: "Goals app in SwiftUI"),
            DTCourse(title: "Disney Plus Clone in SwiftUI"),
            DTCourse(title: "TextField Deep Dive"),
            DTCourse(title: "List View Deep Dive"),
            DTCourse(title: "Image View Deep Dive"),
            DTCourse(title: "Label Deep Dive"),
            DTCourse(title: "SwiftUI Deep Dive"),
            DTCourse(title: "Goals app in SwiftUI"),
            DTCourse(title: "Disney Plus Clone in SwiftUI"),
            DTCourse(title: "TextField Deep Dive"),
            DTCourse(title: "List View Deep Dive"),
            DTCourse(title: "Image View Deep Dive"),
            DTCourse(title: "Label Deep Dive")
        ]
    }
}
Once we have all the courses listed in object array, we will use that to build out our view.
struct ScrollviewReaderWithList: View {

    @State private var scrollToID = ""

    private let categories = ["SwiftUI", "UIKit", "Machine Learning"]

    var body: some View {
        ScrollViewReader { proxy in

            HStack {

                Spacer()

                Button("SwiftUI") {
                    withAnimation {
                        proxy.scrollTo(categories[0], anchor: .top)
                    }
                }
                .foregroundColor(.white)
                .padding()
                .background(RoundedRectangle(cornerRadius: 10).fill(Color.orange))

                Spacer()

                Button("UIKit") {
                    withAnimation {
                        proxy.scrollTo(categories[1], anchor: .top)
                    }
                }
                .foregroundColor(.white)
                .padding()
                .background(RoundedRectangle(cornerRadius: 10).fill(Color.orange))

                Spacer()

                Button("ML") {
                    withAnimation {
                        proxy.scrollTo(categories[2], anchor: .top)
                    }
                }
                .foregroundColor(.white)
                .padding()
                .background(RoundedRectangle(cornerRadius: 10).fill(Color.orange))

                Spacer()
            }

            List {
                Section(header: Text("SwiftUI Courses")) {
                    ForEach(DTCourse.swiftUISample) { course in
                        Text(course.title)
                    }
                }.id(categories[0])

                Section(header: Text("UIKit Courses")) {
                    ForEach(DTCourse.swiftUISample) { course in
                        Text(course.title)
                    }
                }.id(categories[1])

                Section(header: Text("Machine Learning Courses")) {
                    ForEach(DTCourse.swiftUISample) { course in
                        Text(course.title)
                    }
                }.id(categories[2])


            }
        }
    }
}
With that, we have reached the end of this article. If you liked the article, don’t forget to subscribe. Checkout our video courses here https://www.devtechie.com
Thank you
DT