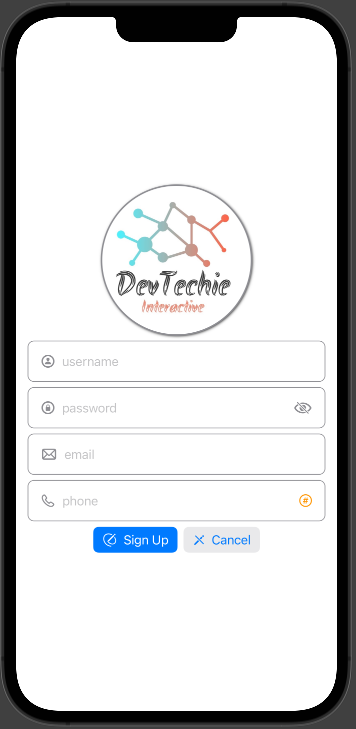
struct TextFieldExample: View {

    @State private var username = ""
    @State private var password = ""
    @State private var email = ""
    @State private var phone = ""

    var body: some View {
        VStack {

            Image("dt")
                .clipShape(Circle())
                .shadow(color: Color.black, radius: 2, x: 1, y: 1)
                .overlay(Circle().stroke(Color.gray, lineWidth: 2))

            // username
            HStack {
                Image(systemName: "person.circle")
                    .foregroundColor(.gray).font(.headline)
                TextField("username", text: $username)
            }
            .padding()
            .overlay(RoundedRectangle(cornerRadius: 8).stroke(Color.gray, lineWidth: 1))
            .padding(.horizontal)

            //password
            HStack {
                Image(systemName: "lock.circle")
                    .foregroundColor(.gray).font(.headline)
                TextField("password", text: $password)
                Image(systemName: "eye.slash")
                    .foregroundColor(.gray).font(.headline)
            }
            .padding()
            .overlay(RoundedRectangle(cornerRadius: 8).stroke(Color.gray, lineWidth: 1))
            .padding(.horizontal)

            // email
            HStack {
                Image(systemName: "envelope")
                    .foregroundColor(.gray).font(.headline)
                TextField("email", text: $email)
            }
            .padding()
            .overlay(RoundedRectangle(cornerRadius: 8).stroke(Color.gray, lineWidth: 1))
            .padding(.horizontal)

            // email
            HStack {
                Image(systemName: "phone")
                    .foregroundColor(.gray).font(.headline)
                TextField("phone", text: $email)
                Button(action: {}) {
                    Image(systemName: "number.circle")
                }
                .tint(.orange)
            }
            .padding()
            .overlay(RoundedRectangle(cornerRadius: 8).stroke(Color.gray, lineWidth: 1))
            .padding(.horizontal)

            HStack {
                Button(action: {}) {
                    Label("Sign Up", systemImage: "pencil.and.outline")
                }
                .buttonStyle(.borderedProminent)


                Button(action: {}) {
                    Label("Cancel", systemImage: "pencil.slash")
                }
                .buttonStyle(.bordered)
            }
        }
    }
}