Build Travel UI in SwiftUI
DevTechie Inc
Jun 17, 2022
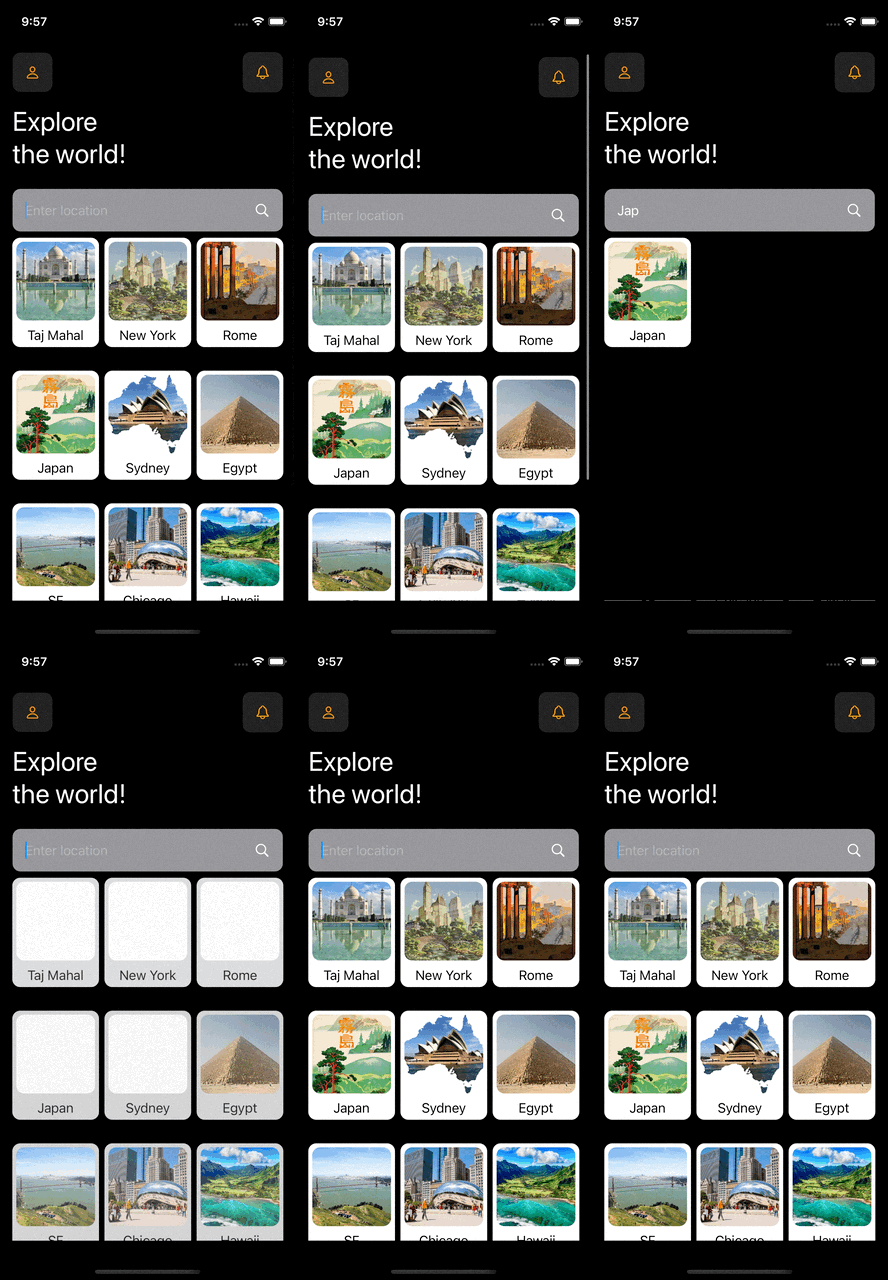
Building UI in SwiftUI is not only easy but its fun too. Today, we will build a simple UI to list famous destinations. Here is how our final output will look like:

We will start with simple model, let’s call is Destination :
struct Destination: Identifiable {
    var id = UUID().uuidString
    var name: String = ""
    var imageString: String = ""
}
Let’s add sample data:
extension Destination {
    static var sampleData: [Destination] {
        [
            Destination(name: "Taj Mahal", imageString: "https://openclipart.org/image/800px/220320"),
            Destination(name: "New York", imageString: "https://openclipart.org/image/800px/226824"),
            Destination(name: "Rome", imageString: "https://openclipart.org/image/800px/222548"),
            Destination(name: "Japan", imageString: "https://openclipart.org/image/800px/222546"),
            Destination(name: "Sydney", imageString: "https://openclipart.org/image/800px/254600"),
            Destination(name: "Egypt", imageString: "https://upload.wikimedia.org/wikipedia/commons/e/e3/Kheops-Pyramid.jpg"),
            Destination(name: "SF", imageString: "https://a.cdn-hotels.com/gdcs/production43/d419/4563a5ba-2f0a-492c-b2a1-99e36be9887a.jpg?impolicy=fcrop&w=1600&h=1066&q=medium"),
            Destination(name: "Chicago", imageString: "https://sbadamsthetower.com/wp-content/uploads/2019/02/20170928a.jpg"),
            Destination(name: "Hawaii", imageString: "https://cdn.aarp.net/content/dam/aarp/travel/Domestic/2021/12/1140-oahu-hero.imgcache.rev.web.1140.655.jpg"),
            Destination(name: "Bora bora", imageString: "https://www.planetware.com/wpimages/2021/05/french-polynesia-bora-bora-best-resorts-the-st-regis-bora-bora.jpg"),
            Destination(name: "Tokyo", imageString: "https://res.cloudinary.com/duu3v9gfg/image/fetch/t_fit_1920/https://78884ca60822a34fb0e6-082b8fd5551e97bc65e327988b444396.ssl.cf3.rackcdn.com/up/2019/08/Mount-Fuji-1565615301-1565615301.jpg"),
            Destination(name: "Cancun", imageString: "https://www.royalresorts.com/img/pages/destinations/cancun/800/cancun-banner.jpg")
        ]
    }
}
Now is the time to add our swiftUI view:
struct ExploreTheWorld: View {

    var body: some View {
        Text("DevTechie")
    }

}
We will add few variables next. Let’s start with a State variable for searchText binding:
@State private var searchString = ""
Let’s also add GridItem type for our LazyVGrid:
let item = GridItem(.adaptive(minimum: 100, maximum: 150))
Next we will add a computed property to return destinations based on text in searchString:
var destinations: [Destination] {
    if searchString.isEmpty {
        return Destination.sampleData
    }
    return Destination.sampleData.filter({ $0.name.lowercased().contains(searchString.lowercased())})
}
Let’s also create more computed properties for our various components.
We will start with top navigation:
var topNav: some View {
        HStack {
            Image(systemName: "person")
                .foregroundColor(.orange)
                .padding()
                .background(.thinMaterial, in: RoundedRectangle(cornerRadius: 10))
                .clipped()
                .shadow(radius: 2)

            Spacer()

            Image(systemName: "bell")
                .foregroundColor(.orange)
                .padding()
                .background(.thinMaterial, in: RoundedRectangle(cornerRadius: 10))
                .clipped()
                .shadow(radius: 2)

        }
    }
Next, property for title:
var topTitle: some View {
        Text("Explore \nthe world!")
            .font(.largeTitle)
    }
Now, we will add property for search view:
var searchBar: some View {
    HStack {
        TextField("Enter location", text: $searchString)
        Image(systemName: "magnifyingglass")
    }
    .padding()
    .background(.gray, in: RoundedRectangle(cornerRadius: 10))
    .clipped()
    .shadow(radius: 2)
}
Last but not the least, destination list view:
var destinationList: some View {
        LazyVGrid(columns: [item], alignment: .center, spacing: 30) {
            ForEach(destinations) { destination in
                VStack {
                    AsyncImage(url: URL(string: destination.imageString)!) { img in
                        img
                            .resizable()
                            .scaledToFill()
                            .frame(width: 100, height: 100)
                            .clipShape(RoundedRectangle(cornerRadius: 10))
                    } placeholder: {
                        RoundedRectangle(cornerRadius: 10)
                            .frame(width: 100, height: 100)
                    }

                    Text(destination.name)
                        .foregroundColor(.black)
                }
                .padding(.vertical, 5)
                .padding(.horizontal, 5)
                .background(.primary, in: RoundedRectangle(cornerRadius: 10))
            }
        }
        .animation(.easeInOut, value: searchString)
    }
Because we have all the views in the form of computed properties, all we need to do now is to put them together inside the body for the main view:
var body: some View {
    ScrollView {
        VStack(alignment: .leading) {
            topNav
            topTitle
            searchBar
            destinationList
        }
        .padding(.horizontal)
    }
    .padding(.vertical)
}
Complete view will look like this:
struct ExploreTheWorld: View {

    @State private var searchString = ""
    let item = GridItem(.adaptive(minimum: 100, maximum: 150))


    var destinations: [Destination] {
        if searchString.isEmpty {
            return Destination.sampleData
        }
        return Destination.sampleData.filter({ $0.name.lowercased().contains(searchString.lowercased())})
    }

    var destinationList: some View {
        LazyVGrid(columns: [item], alignment: .center, spacing: 30) {
            ForEach(destinations) { destination in
                VStack {
                    AsyncImage(url: URL(string: destination.imageString)!) { img in
                        img
                            .resizable()
                            .scaledToFill()
                            .frame(width: 100, height: 100)
                            .clipShape(RoundedRectangle(cornerRadius: 10))
                    } placeholder: {
                        RoundedRectangle(cornerRadius: 10)
                            .frame(width: 100, height: 100)
                    }

                    Text(destination.name)
                        .foregroundColor(.black)
                }
                .padding(.vertical, 5)
                .padding(.horizontal, 5)
                .background(.primary, in: RoundedRectangle(cornerRadius: 10))
            }
        }
        .animation(.easeInOut, value: searchString)
    }

    var searchBar: some View {
        HStack {
            TextField("Enter location", text: $searchString)
            Image(systemName: "magnifyingglass")
        }
        .padding()
        .background(.gray, in: RoundedRectangle(cornerRadius: 10))
        .clipped()
        .shadow(radius: 2)
    }

    var topTitle: some View {
        Text("Explore \nthe world!")
            .font(.largeTitle)
    }

    var topNav: some View {
        HStack {
            Image(systemName: "person")
                .foregroundColor(.orange)
                .padding()
                .background(.thinMaterial, in: RoundedRectangle(cornerRadius: 10))
                .clipped()
                .shadow(radius: 2)

            Spacer()

            Image(systemName: "bell")
                .foregroundColor(.orange)
                .padding()
                .background(.thinMaterial, in: RoundedRectangle(cornerRadius: 10))
                .clipped()
                .shadow(radius: 2)

        }
    }

    var body: some View {
        ScrollView {
            VStack(alignment: .leading) {
                topNav
                topTitle
                searchBar
                destinationList
            }
            .padding(.horizontal)
        }
        .padding(.vertical)
    }
}
With that we have reached the end of this article. Thank you once again for reading. Subscribe our weekly newsletter at https://www.devtechie.com
