- Jan 9
Shapes in glassEffect with SwiftUI and iOS 26
- DevTechie
- SwiftUI
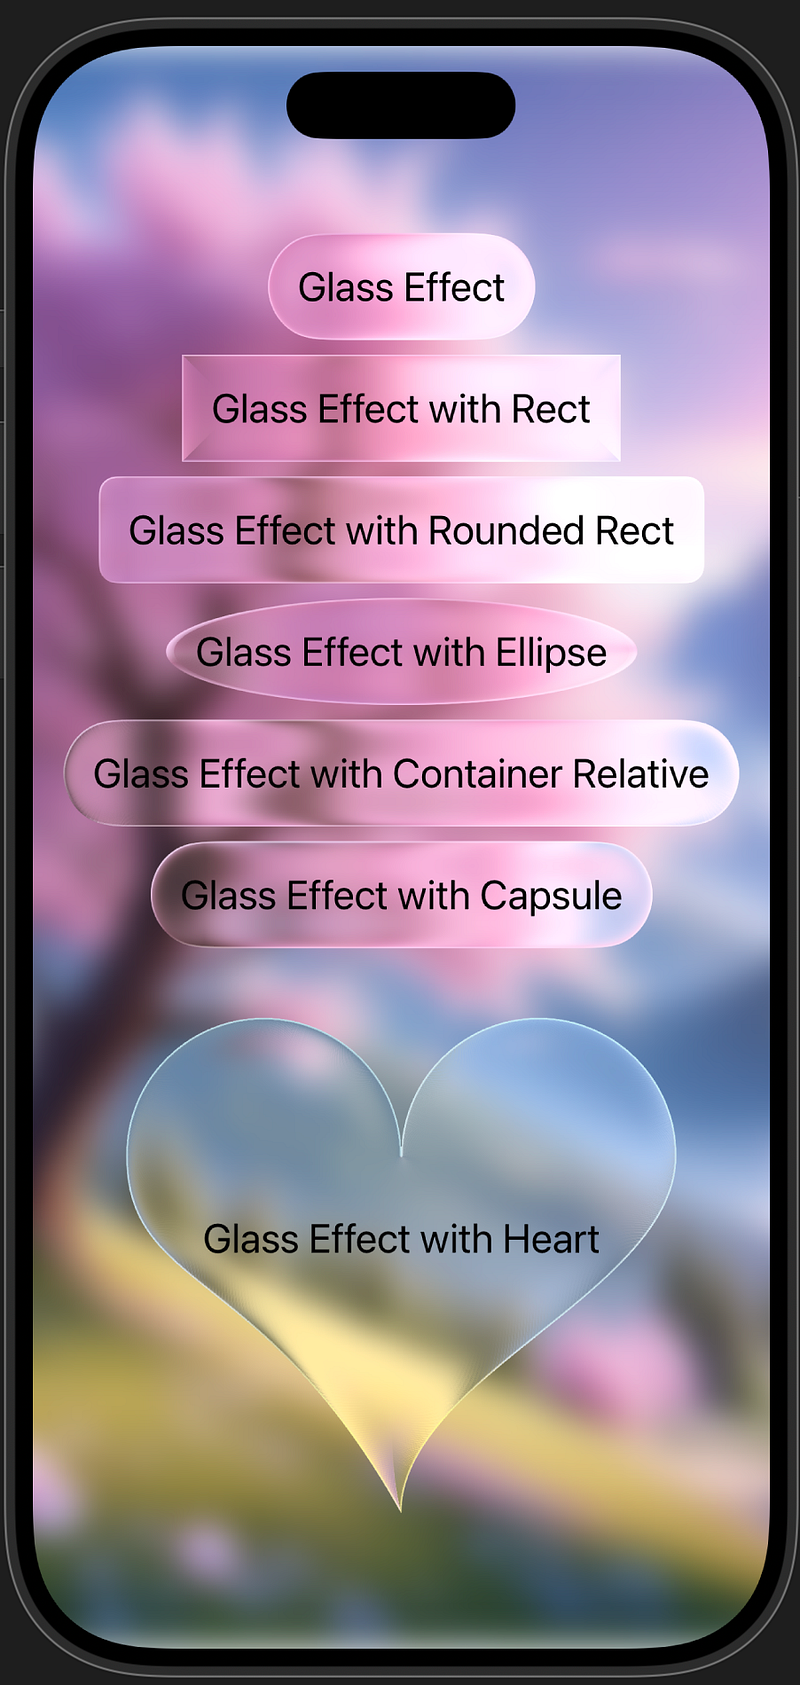
SwiftUI’s glassEffect modifier allows you to define the visual boundary of a glass surface using a shape. While it is commonly demonstrated with rectangles or circles, the modifier accepts any Shape, enabling precise control over how the glass blur is clipped and rendered. This makes glassEffect far more flexible than it initially appears, especially when combined with custom vector paths.
In this article, we will build a series of examples that show how glassEffect clips and renders differently shaped glass surfaces, from standard geometry to fully custom shapes. Understanding this behavior is essential for designing expressive, modern interfaces that take full advantage of SwiftUI’s rendering system.
Let’s start with basic example with just the glassEffect
import SwiftUI

struct GlassEffectCornerRadius: View {
    var body: some View {
        VStack {
            Text("Glass Effect")
                .font(.title2)
                .padding()
                .glassEffect(.clear)

        }
        .frame(maxWidth: .infinity, maxHeight: .infinity)
        .background {
            Image(.sample)
                .resizable()
                .scaledToFill()
                .blur(radius: 10)
                .ignoresSafeArea()
        }
    }
}
Next, add a rectangular shape using .glassEffect(.clear, in: .rect)
struct GlassEffectCornerRadius: View {
    var body: some View {
        VStack {
            Text("Glass Effect")
                .font(.title2)
                .padding()
                .glassEffect(.clear)

            Text("Glass Effect with Rect")
                .font(.title2)
                .padding()
                .glassEffect(.clear, in: .rect)

        }
        .frame(maxWidth: .infinity, maxHeight: .infinity)
        .background {
            Image(.sample)
                .resizable()
                .scaledToFill()
                .blur(radius: 10)
                .ignoresSafeArea()
        }
    }
}

#Preview {
    GlassEffectCornerRadius()
}
Let’s add a few more
import SwiftUI

struct GlassEffectCornerRadius: View {
    var body: some View {
        VStack {
            Text("Glass Effect")
                .font(.title2)
                .padding()
                .glassEffect(.clear)

            Text("Glass Effect with Rect")
                .font(.title2)
                .padding()
                .glassEffect(.clear, in: .rect)

            Text("Glass Effect with Rounded Rect")
                .font(.title2)
                .padding()
                .glassEffect(.clear, in: .rect(cornerRadius: 10))

            Text("Glass Effect with Ellipse")
                .font(.title2)
                .padding()
                .glassEffect(.clear, in: .ellipse)

            Text("Glass Effect with Container Relative")
                .font(.title2)
                .padding()
                .glassEffect(.clear, in: .containerRelative)

            Text("Glass Effect with Capsule")
                .font(.title2)
                .padding()
                .glassEffect(.clear, in: .capsule)

        }
        .frame(maxWidth: .infinity, maxHeight: .infinity)
        .background {
            Image(.sample)
                .resizable()
                .scaledToFill()
                .blur(radius: 10)
                .ignoresSafeArea()
        }
    }
}
You are not limited to predefined shapes when using glassEffect. Because the modifier accepts any type conforming to Shape, you can define and apply custom vector paths to control the exact boundary of the glass surface. This flexibility allows you to move beyond standard geometry and create more expressive, refined visual effects, resulting in interfaces that feel more intentional and visually engaging.
Let’s try this with custom heart shape.
struct HeartShape: Shape {
    func path(in rect: CGRect) -> Path {
        var path = Path()

        let size = min(rect.width, rect.height)
        let xOffset = rect.midX - size / 2
        let yOffset = rect.midY - size / 2

        func p(_ x: CGFloat, _ y: CGFloat) -> CGPoint {
            CGPoint(x: xOffset + x, y: yOffset + y)
        }

        path.move(to: p(size / 2, size))

        path.addCurve(
            to: p(0, size * 0.35),
            control1: p(size * 0.25, size * 0.55),
            control2: p(0, size * 0.6)
        )

        path.addArc(
            center: p(size * 0.25, size * 0.35),
            radius: size * 0.25,
            startAngle: .degrees(180),
            endAngle: .degrees(0),
            clockwise: false
        )

        path.addArc(
            center: p(size * 0.75, size * 0.35),
            radius: size * 0.25,
            startAngle: .degrees(180),
            endAngle: .degrees(0),
            clockwise: false
        )

        path.addCurve(
            to: p(size / 2, size),
            control1: p(size, size * 0.6),
            control2: p(size * 0.5, size * 0.75)
        )

        return path
    }
}
Using shape inside the view
struct GlassEffectCornerRadius: View {
    var body: some View {
        VStack {
            Text("Glass Effect")
                .font(.title2)
                .padding()
                .glassEffect(.clear)

            Text("Glass Effect with Rect")
                .font(.title2)
                .padding()
                .glassEffect(.clear, in: .rect)

            Text("Glass Effect with Rounded Rect")
                .font(.title2)
                .padding()
                .glassEffect(.clear, in: .rect(cornerRadius: 10))

            Text("Glass Effect with Ellipse")
                .font(.title2)
                .padding()
                .glassEffect(.clear, in: .ellipse)

            Text("Glass Effect with Container Relative")
                .font(.title2)
                .padding()
                .glassEffect(.clear, in: .containerRelative)

            Text("Glass Effect with Capsule")
                .font(.title2)
                .padding()
                .glassEffect(.clear, in: .capsule)

            Text("Glass Effect with Heart")
                .font(.title2)
                .padding()
                .frame(width: 300, height: 300)
                .glassEffect(.clear, in: HeartShape())

        }
        .frame(maxWidth: .infinity, maxHeight: .infinity)
        .background {
            Image(.sample)
                .resizable()
                .scaledToFill()
                .blur(radius: 10)
                .ignoresSafeArea()
        }
    }
}
This opens up new doors and opportunities for apps. For example, you can create something like this
Checkout detailed articles for this example:
Detailed SwiftUI Tutorials
Exclusive and complete tutorials with code examples.www.devtechie.com
Visit https://www.devtechie.com for more