- Aug 30, 2025
Detect PII entities using Azure Language Service.
- DevTechie Inc
- Azure Computer Vision
In this article we are building a service that detects Personally Identifiable Information (PII) is a crucial step for data privacy and security. The provided C# code snippet shows how to do this using a .NET Core Web API and the Azure AI Language service. Let’s break down the process into three main points: setting up the Azure resource, understanding the API code, and testing it with Postman.
Setting Up the Azure AI Language Resource
Before you can run the code, you need to provision the necessary AI service in Azure. The TextAnalyticsClient in the code connects to a cloud-based service called Azure AI Language. This service provides powerful Natural Language Processing (NLP) features, including PII detection, sentiment analysis, key phrase extraction, and more.
Here’s what you need to do on the Azure side:
Create an Azure AI Language Resource: In the Azure Portal, search for “Language service” and create a new resource. This service is part of the broader Azure AI services.
Configure the Resource: During creation, you’ll need to specify a subscription, a resource group, a region, and a name for your service. Choosing a pricing tier like Free F0 is perfect for development and testing.
Get Your Credentials: Once the resource is deployed, navigate to its Keys and Endpoint section. You’ll find the endpoint URL and two API keys. These are the endpoint and apiKey values your C# code will use to authenticate and send requests to the service.
The Azure AI Language service handles the complex machine learning models for you. You don’t have to train a model to detect common PII types like credit card numbers, phone numbers, or social security numbers; the service provides this functionality out-of-the-box.
Below is the screen shot of how we can create Language resource in Azure

2. The .NET Core Wrapper API
The C# code snippet is a .NET Core Web API endpoint that acts as a wrapper around the Azure AI Language service. It provides a simple, accessible way to integrate PII detection into any application.
Let’s look at the key parts of the code:
[HttpGet(“DetectPii”)]: This attribute defines a GET endpoint named DetectPii. It’s designed to accept a string input via a query parameter.
public async Task<PiiDetectionResult> DetectPii(string inputText): This is the method signature. It takes a single string parameter, inputText, which will contain the text to be analyzed. The method returns a PiiDetectionResult object, which is a custom data model for the output.
var client = new TextAnalyticsClient(…): This line creates an instance of the TextAnalyticsClient. It’s initialized with the endpoint and API key retrieved from your Azure resource. This client is the main interface for interacting with the Azure AI Language service.
var response = client.RecognizePiiEntities(inputText): This is the core of the PII detection. The RecognizePiiEntities method sends the inputText to the Azure service. The service analyzes the text and returns a response containing the redacted text (where PII is masked) and a collection of the detected entities.
Processing the Result: The code then populates a PiiDetectionResult object. It stores the RedactedText and iterates through the detected entities. For each entity, it extracts the original text, its category (e.g., PhoneNumber, CreditCardNumber), and a confidence score, which indicates how sure the model is about its detection.
This API acts as a secure intermediary between your application and the Azure service, handling the authentication and data formatting.
Below is the code snippet:
[HttpGet("DetectPii")]
public async Task<PiiDetectionResult> DetectPii(string inputText)
{
string endpoint = AzureAIConstants.LanguageEndpoint;
string apiKey = AzureAIConstants.LanguageApiKey;
var client = new TextAnalyticsClient(new Uri(endpoint), new AzureKeyCredential(apiKey));
var response = client.RecognizePiiEntities(inputText);
var result = new PiiDetectionResult
{
RedactedText = response.Value.RedactedText,
Entities = new List<string>()
};
foreach (var entity in response.Value)
{
result.Entities.Add($"{entity.Text} ({entity.Category}) - Confidence: {entity.ConfidenceScore:F2}");
}
return result;
}
public class PiiDetectionResult
{
public string RedactedText { get; set; }
public List<string> Entities { get; set; }
}3. Testing with Postman
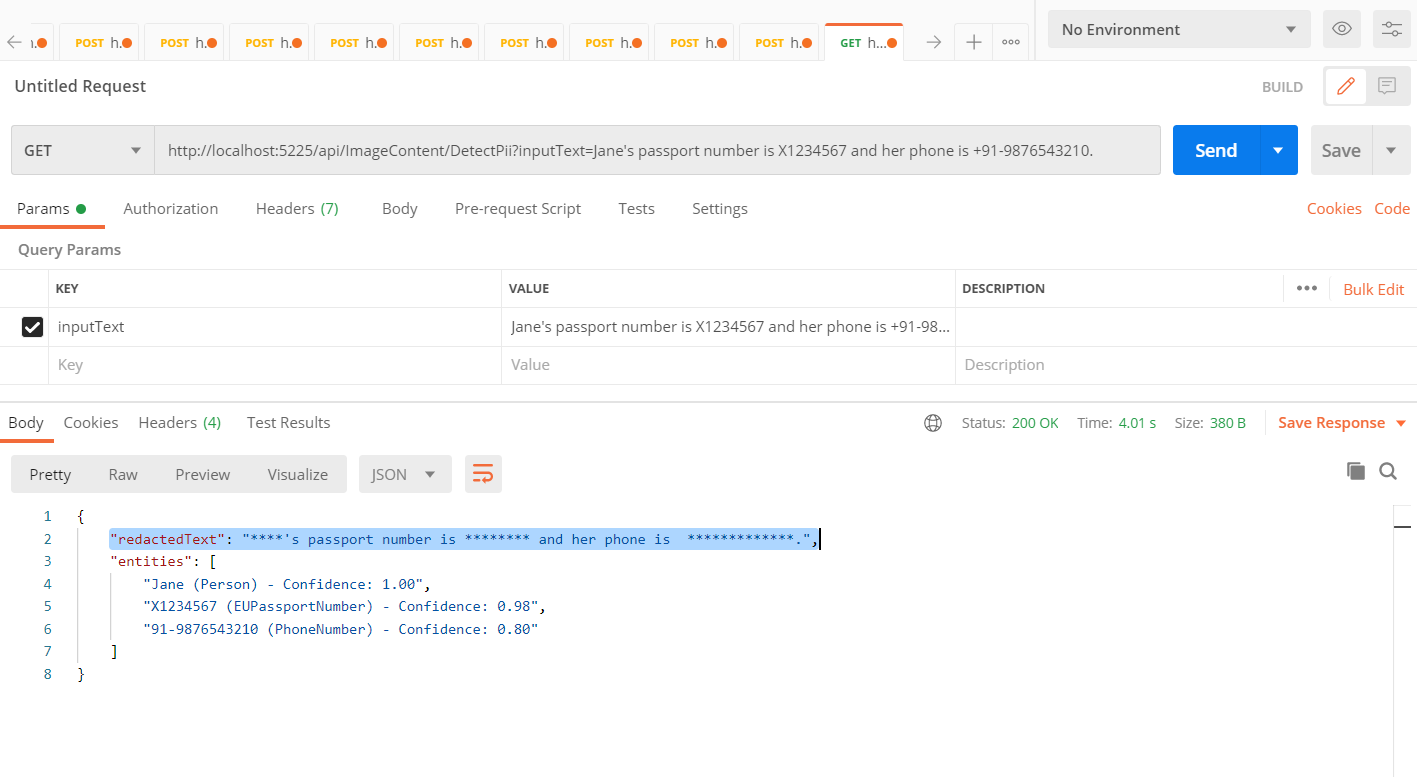
Testing a GET request with query parameters is straightforward using Postman. It’s a great way to ensure your API and the connection to the Azure service are working correctly.
Here’s how to test the DetectPii endpoint:
Set the Request Method: In Postman, set the request type to GET.
Enter the URL: Use the URL for your local API. It will follow the pattern https://localhost:<port>/api/Transcript/DetectPii.
Add the Query Parameter: Click on the Params tab next to the URL bar. This is where you’ll define the query parameter for the inputText.
In the KEY column, type inputText.
In the VALUE column, enter a sample string that contains PII, like a phone number or an address. For example: “Jane’s passport number is X1234567 and her phone is +91–0000000000.”
Send the Request: Click the Send button.
You should receive a 200 OK response with a JSON body. The response will contain the RedactedText with the PII masked (e.g., John Doe’s number is *********** and his email is *******************) and a list of the detected entities with their categories and confidence scores.
Below is the screen shot: