- Sep 11, 2024
Flink : Running your first flink program
- DevTechie Inc
We have seen in one of the previous articles as how to get up and running with flink. Few of the student faced problems with flink installation because of Java, so I decided to take a new system and try it myself. In this article, we will see some common problem I encountered and its solution. We will then run our first flink program from the examples that come with flink. So without further ado, let’s get going.
Open up the terminal. After downloading flink and applying below would create a flink directory. At the time of writing this article flink 1.20.0 is the latest version that is downloaded.
(base) xxx@devtechies-mbp Downloads % tar xzf flink-1.20.0-bin-scala_2.12.tarWe can check the flink directory
(base) xxx@devtechies-mbp Downloads % ls -lt|head -5This shows me directory name flink-1.20.0. When starting the cluster as shown below we get some error
(base) xxx@devtechies-mbp Downloads % cd flink-1.20.0
(base) xxx@devtechies-mbp flink-1.20.0 % ls
(base) xxx@devtechies-mbp flink-1.20.0 % ./bin/start-cluster.sh
Executing above gave me below set of errors
/Users/xxx/Downloads/flink-1.20.0/bin/config.sh: line 288: > 17 : syntax error: operand expected (error token is "> 17 ")
Starting cluster.
/Users/xxx/Downloads/flink-1.20.0/bin/config.sh: line 288: > 17 : syntax error: operand expected (error token is "> 17 ")
[ERROR] The execution result is empty.
[ERROR] Could not get JVM parameters and dynamic configurations properly.
[ERROR] Raw output from BashJavaUtils:
The operation couldn’t be completed. Unable to locate a Java Runtime.
Please visit http://www.java.com for information on installing Java.
Clearly, this error shows that it is not finding JVM so it needs installation. As per flink’s documentation, it supports Java11 and experimental support was added for flink version 1.18.0. In this article, to keep things simple, we will install Java 11.
I will use brew to install Java. If you don’t have brew installed, then first install brew. There is a good medium post explaining brew installation here.
I am updating brew as I had installed quite a while back.
(base) xxx@devtechies-mbp Downloads % brew updateIf you get permission error as below
Error: /usr/local/Homebrew is not writable. You should change the
ownership and permissions of /usr/local/Homebrew back to your
user account:
then, first grant the permission by providing your machine’s password
(base) xxx@devtechies-mbp Downloads % sudo chown -R $(whoami) /usr/local/Homebrew
Password:
Once brew is updated, we will use brew to install java11
brew install java11If you get permission issues, fix it as in previous step
After running above, I got the error below
Error: python@3.12: the bottle needs the Apple Command Line Tools to be installed.
  You can install them, if desired, with:
    xcode-select --install

If you're feeling brave, you can try to install from source with:
  brew install --build-from-source python@3.12
I decided to be brave and went with below
brew install --build-from-source python@3.12This resulted in another error
Error: Cannot link fontconfig
Another version is already linked: /usr/local/Cellar/fontconfig/2.14.2
I tried to Symlink it as below since the system won’t be able to find a java runtime
sudo ln -sfn /usr/local/opt/openjdk@11/libexec/openjdk.jdk /Library/Java/JavaVirtualMachines/openjdk-11.jdkOn running brew install java11 again, however, it still gave me the previous error. So I decided to install it using below
brew reinstall fontconfigwhich got me another permission error
Error: Permission denied @ apply2files - /usr/local/share/gettext/its/fontconfig.itsAfter fixing permission error and rerunning brew reinstall things went on fine
(base) xxx@devtechies-mbp Downloads % sudo chown -R xxx /usr/local/share/gettext/its/fontconfig.its
Password:
(base) xxx@devtechies-mbp Downloads % brew reinstall fontconfig
Checked java version
(base) xxx@devtechies-mbp ~ % java --version
openjdk 11.0.24 2024-07-16
OpenJDK Runtime Environment Homebrew (build 11.0.24+0)
OpenJDK 64-Bit Server VM Homebrew (build 11.0.24+0, mixed mode)
Note: For the system Java wrappers to find this JDK, symlink it with
sudo ln -sfn /usr/local/opt/openjdk@11/libexec/openjdk.jdk /Library/Java/JavaVirtualMachines/openjdk-11.jdkopenjdk@11 is keg-only, which means it was not symlinked into /usr/local, because this is an alternate version of another formula.
Running your first flink program
We will just run the example that comes with flink i.e. a simple socket window word count program to test out our flink installation. This program takes the text data that is coming in from socket stream and prints out the count of the word. So first thing we will start the cluster
(base) xxx@devtechies-mbp flink-1.20.0 % ./bin/start-cluster.sh
Starting cluster.
[INFO] 1 instance(s) of standalonesession are already running on devtechies-mbp.lan.
Starting standalonesession daemon on host devtechies-mbp.lan.
[INFO] 1 instance(s) of taskexecutor are already running on devtechies-mbp.lan.
Starting taskexecutor daemon on host devtechies-mbp.lan.
Next we open 2 different terminals, lets call it terminal 1 and terminal 2
In terminal 1, since we need to specify the port where this program will be running we can do so by using net cat utility as below
(base) xxx@devtechies-mbp ~ % nc -l 9000In terminal 2, we will use tail command to print the output as below
(base) xxx@devtechies-mbp flink-1.20.0 % tail -f /Users/xxx/Downloads/flink-1.20.0/log/flink-xxx-taskexecutor-0-devtechies-mbp.lan.outNow in our main terminal (where we installed Java) we will run flink as below
(base) xxx@devtechies-mbp flink-1.20.0 % ./bin/flink run \
      --detached \
      ./examples/streaming/SocketWindowWordCount.jar --port 9000
Job has been submitted with JobID 10fb1b6421d3ac78b8ce87ddd074f28a
Now you can give some input in terminal 1 as shown below

And see the output in terminal 2 as below
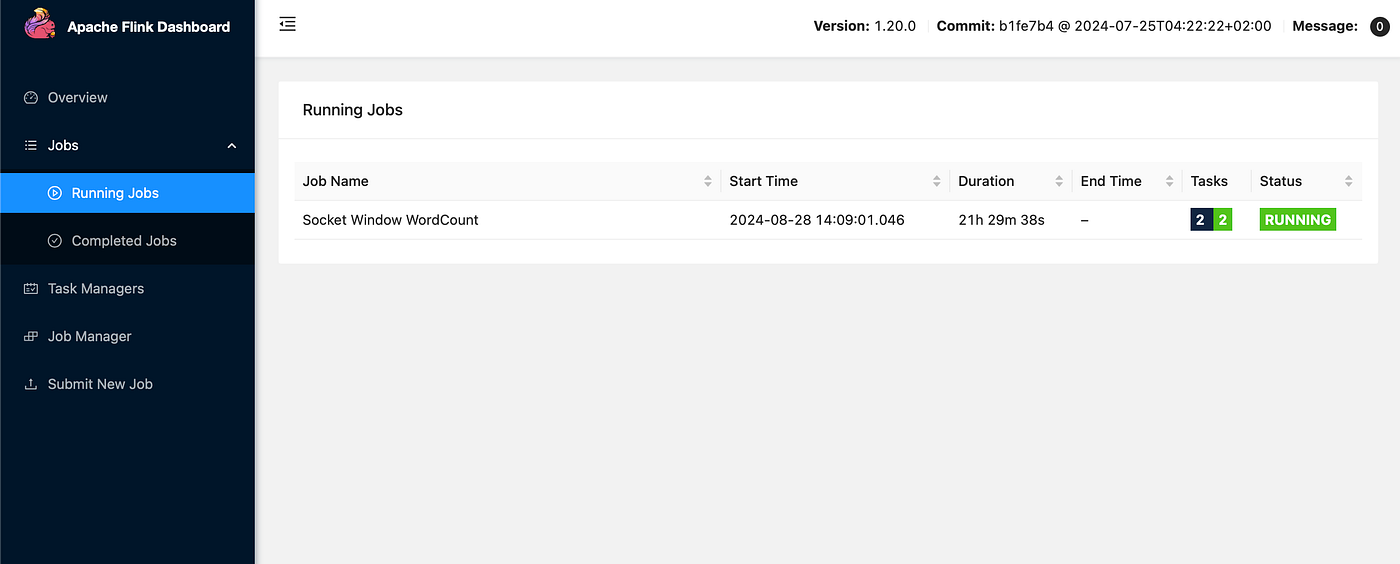
Navigating to Flink UI at localhost:8081/ you should see this job under job manager
With that we have reached the end of this article. Thank you once again for reading. Don’t forget to 👏 and follow 😍. Also subscribe our newsletter at https://www.devtechie.com