- Aug 16, 2025
Detect Objects in Images with Azure Computer Vision
- DevTechie Inc
Are you looking to add object detection capabilities to your applications? This guide will walk you through the process of using Azure’s powerful Computer Vision service to detect objects within images. This approach is ideal for developers who want to integrate AI-powered image analysis into their projects.
Step 1: Create the Azure Vision Resource
The first step is to set up a computer vision resource in the Azure portal. This resource is the foundation for your object detection service, providing the AI models and the connectivity you need. Once created, Azure will generate an endpoint and access keys that are essential for authenticating and communicating with the service.
Steps to create the Azure AI Vision resource in the Azure portal:
Sign In: Navigate to the Azure portal at https://portal.azure.com/ and sign in with your Azure credentials.
Create a Resource: On the Azure portal homepage, click the “+ Create a resource” button.
Search: In the search bar, type “Computer Vision” or “Azure AI Vision” and select the corresponding service from the results.
Initiate Creation: On the service’s overview page, click the “Create” button.
Configure Details: Fill in the required information on the configuration page:
Subscription: Select the Azure subscription you want to use.
Resource group: Choose an existing resource group or create a new one to organize your resources.
Region: Select a geographical location for your service. Choosing a region close to your users can help reduce latency.
Name: Give your resource a unique, descriptive name.
Pricing tier: Choose a pricing tier that fits your needs. The F0 (Free) tier is a great option for trying out the service.
Review and Deploy: After filling out the details, click “Review + create”. Azure will validate your settings. If everything is correct, click “Create” to begin the deployment.
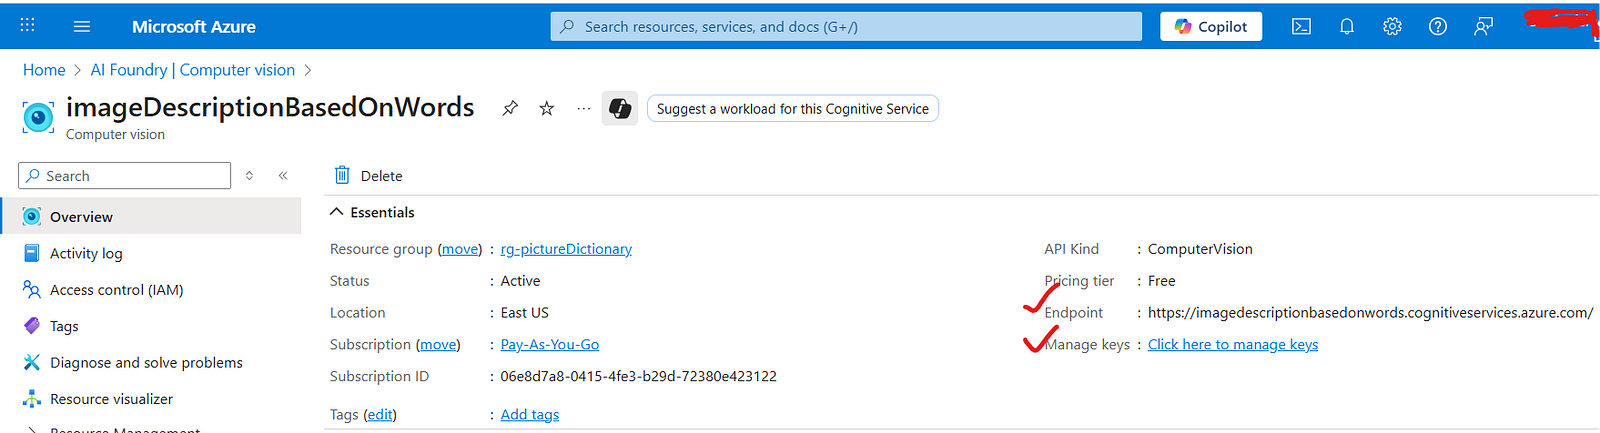
Retrieve Endpoint and Keys: Once the deployment is complete, navigate to your new resource. In the left-hand menu, under “Resource Management,” click on “Keys and Endpoint.” Here you will find the Endpoint URL and your two access Keys. Make sure to copy and store these securely, as you will need them for your API.
Below is the screenshot of Azure portal how we can create the required service.

In the below screenshot we can see endpoints and keys.
Step 2: Build a .net Core Wrapper API
To make the computer vision service easy to use in your applications, you’ll need to create a .NET Core web API to serve as a wrapper. This API will handle the communication between your application and the Azure service. The video demonstrates how this wrapper API receives an image, sends it to the Azure computer vision resource for analysis, processes the results, and then returns them to the user.
Below is the API method in .net core:
[HttpPost("detectobjectsinImage")]
public async Task<IActionResult> DetectObjects([FromForm] IFormFile imageFile)
{
    // Check if the uploaded file is null or empty
    if (imageFile == null || imageFile.Length == 0)
        return BadRequest("Please upload a valid image."); // Return a 400 Bad Request response if no file is provided

    try
    {
        // Initialize the ComputerVisionClient with API credentials
        var client = new ComputerVisionClient(
            new ApiKeyServiceClientCredentials(AzureAIConstants.ComputerVisionApiKey)) // Use the API key for authentication
        {
            Endpoint = AzureAIConstants.ComputerVisionEndpoint // Set the endpoint for the Computer Vision service
        };

        // Open a readable stream for the uploaded image file
        using var stream = imageFile.OpenReadStream();

        // Call the Azure Computer Vision API to detect objects in the image
        var result = await client.DetectObjectsInStreamAsync(stream);

        // Process the detected objects and map them to a structured format
        var objects = result.Objects.Select(obj => new
        {
            Name = obj.ObjectProperty, // Name of the detected object
            Confidence = obj.Confidence, // Confidence score of the detection(0-1) .The confidence value is the model’s internal score for each detected object. It’s a floating-point number between 0 and 1 (where 1 = 100% certain), indicating the probability that the labelled object is actually present in that bounding box.
            //A bounding box is simply a rectangle that defines where an object lives in an image.
            BoundingBox = new
            {
                X = obj.Rectangle.X, // X-coordinate of the bounding box
                Y = obj.Rectangle.Y, // Y-coordinate of the bounding box
                Width = obj.Rectangle.W, // Width of the bounding box
                Height = obj.Rectangle.H // Height of the bounding box
            }
        });

        // Return a 200 OK response with the detected objects
        return Ok(new
        {
            message = "Objects detected successfully", // Success message
            detectedObjects = objects // List of detected objects
        });
    }
    catch (Exception ex)
    {
        // Catch any exceptions and return a 500 Internal Server Error response with the error message
        return StatusCode(500, $"Error detecting objects: {ex.Message}");
    }
}
Step 3: Test the API
The final step is to test your new API to ensure it’s working correctly. The tutorial uses Postman to perform a test. Here an image of a pizza is uploaded to the API. The Azure service successfully detects “food” and “pizza” in the image, and the API returns these results along with a confidence score for each detection. This confirms that the service is correctly identifying objects within the image.
Below is the uploaded image:

Below is the API response:

By following these steps, you can create a robust and efficient object detection solution. To see the full demonstration and get a deeper understanding of the code, watch the full video tutorial here: